If you’re looking for a replacement for cPanel, CyberPanel might be exactly what you need. Jack Wallen shows you how easy this tool is to deploy.

Image: iStockphoto/monstArrr_
If you offer a service that hosts websites and services for clients, you know how important it is to be able to roll those out quickly. This is especially true when those clients mostly work with the likes of WordPress (instead of custom-built sites). You need to be able to spin those sites up quickly and reliably. To that end, you probably depend on the likes of cPanel, hosted either in your data center or a cloud-based service provider.
With CentOS floating down a stream of its own making, and cPanel dropping support, you might be wondering what you can do? You can either wait for cPanel to finally release a version for Ubuntu Server, you can opt to migrate all of your CentOS servers to AlmaLinux or Rocky Linux (once it’s released), or you can try another web panel offering.
One such web panel is CyberPanel. Unlike cPanel, CyberPanel was designed to allow your clients to deploy their own sites with ease. Believe it or not, the platform achieves this on a level that makes it a reality.
SEE: Top 5 programming languages for systems admins to learn (free PDF) (TechRepublic)
Imagine handing that task over to your clients. Your IT staff could be freed up to do other things–like keep your network running and secure.
How do you get CyberPanel up and running? I’m going to show you.
First, you need to know there are two different versions of the tools:
For more information on the Enterprise edition of CyberPanel, check out the feature list and price matrix.
Let’s get the Standard version up and running, so you can kick the tires of CyberPanel.
What you’ll need
CyberPanel can be installed on any server that meets the following requirements:
-
OS: Centos 7.x, Centos 8.x, Ubuntu 18.04, Ubuntu 20.04
-
Python: 3.x
-
RAM: >= 1024MB
-
Storage: >= 10GB
I’ll be demonstrating on Ubuntu Server 20.04, but the process is pretty much the same on every platform.
How to install CyberPanel
The developers of CyberPanel have created an install script that takes care of everything necessary to get the tool up and running. To run the script, you must access the root user. You cannot run the script with sudo privileges, as it will fail. Before you download and run the installer, you must switch to the root user with the command:
sudo su -
If you’re using a Red Hat-based distribution (such as AlmaLinux or Rocky Linux), that command would simply be:
su
Once you have root access, issue the command to download and run the installer:
sh <(curl https://cyberpanel.net/install.sh || wget -O - https://cyberpanel.net/install.sh)
Before the installation commences, you’ll be asked the following:
-
What to install (CyberPanel or Addons and Miscellaneous): Type 1 and hit Enter
-
Version to install (CyberPanel with OpenLiteSpeed or CyberPanel with LiteSpeed Enterprise): Type 1 and hit Enter
-
Install full service: Type 1 and hit Enter
-
Set up remote MySQL: Hit Enter for default (no)
-
Release to install: Hit Enter to install the latest version of CyberPanel
-
Password: Type s, hit Enter, and then type/verify a password for the admin user
-
Install Memcached extension and backend: Type Y and hit Enter
-
Install Redis extension and backend: Type Y and hit Enter
-
Install Watchdog: Type Yes and hit Enter
The installation will take between 10-30 minutes, depending on the speed of your machine and network connection. At the end of the installation, you’ll be informed of all ports that must be open for CyberPanel to function properly. Those ports are:
-
TCP: 8090 for CyberPanel
-
TCP: 80, TCP: 443, and UDP: 443 for the web server
-
TCP: 21 and TCP: 40110-40210 for FTP
-
TCP: 25, TCP: 587, TCP: 465, TCP: 110, TCP: 143, and TCP: 993 for mail service
-
TCP: 53 and UDP: 53 for DNS service
Make sure to open the above ports. How you do this will depend on which firewall you are using on your server. For example, if you’re using UFW, you’d issue the following commands:
sudo ufw allow 8090/tcp
sudo ufw allow 80/tcp
sudo ufw allow 443/tcp
sudo ufw allow 443/udp
sudo ufw allow 21/tcp
sudo ufw allow 40110:20210/tcp
sudo ufw allow 25/tcp
sudo ufw allow 587/tcp
sudo ufw allow 465/tcp
sudo ufw allow 110/tcp
sudo ufw allow 143/tcp
sudo ufw allow 993/tcp
sudo ufw allow 53/tcp
sudo ufw allow 53/udp
After you’ve created the firewall rules, restart your server with the command:
reboot
How to access CyberPanel
When the installation completes, you can then access the web-based interface by pointing a browser to https://SERVER:8090 (where SERVER is the IP address of the hosting server). You will be prompted for a login, where you’ll use admin as the username and the password you created during the installation.
Upon successful authentication, you’ll find yourself on the CyberPanel main window, where you can start customizing it to perfectly meet the needs of your company (Figure A).
Figure A
” data-credit>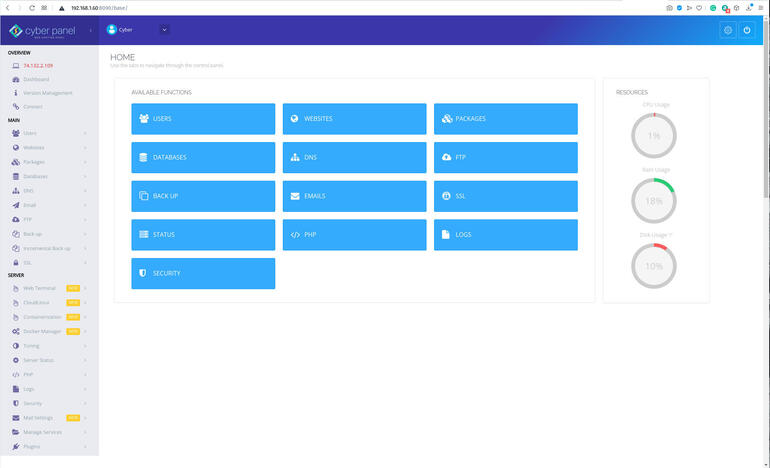
The CyberPanel main window offers tons of features and options.
Congratulations, you can now kick the tires of a very powerful and user-friendly web panel. Spend some time with this platform and see if it can take the place of the de facto standard, cPanel.
Subscribe to TechRepublic’s How To Make Tech Work on YouTube for all the latest tech advice for business pros from Jack Wallen.

Developer Essentials Newsletter
From the hottest programming languages to the jobs with the highest salaries, get the developer news and tips you need to know. Weekly
Also see
Source of Article


