Jack Wallen shows you how easy it is to set up VirtualBox on a headless machine for remote management.

Image: Jack Wallen
VirtualBox is a powerful tool for creating and managing virtual machines. If you want to serve your VMs from a server within your data center, and your preferable management tool is a GUI, what do you do? Once upon a time, you could use phpVirtualBox. Unfortunately, that tool hasn’t been in development for some time. However, there’s another option–RemoteBox.
RemoteBox can be installed on Linux desktops, older releases of macOS (no newer than Catalina), and WSL on Windows 10. With this tool you can manage your VirtualBox VMs as if you were running the software on your desktop.
I’m going to show you how to get this system up and running on Ubuntu 20.04, both Server and Desktop.
SEE: MSP best practices: Server deployment checklist (TechRepublic Premium)
What you’ll need
- Two instances of Ubuntu Linux–one Server and one Desktop
- A user with sudo privileges
How to install the headless VirtualBox server
The first thing to be done is the installation of VirtualBox on your server. Because we don’t have a GUI on the server, we’ll install a headless version.
Log in to your server and download the .deb file with the command:
wget https://download.virtualbox.org/virtualbox/6.1.16/virtualbox-6.1_6.1.16-140961~Ubuntu~eoan_amd64.deb
Install VirtualBox 6.1.16 with the command:
sudo dpkg -i *.deb
Add your user to the vboxusers group:
sudo usermod -aG vboxusers $USER
To make the system aware of the new group, log out of the server and log back in.
Now we must install the VirtualBox extension pack. Download the file with the command:
wget https://download.virtualbox.org/virtualbox/6.1.16/Oracle_VM_VirtualBox_Extension_Pack-6.1.16.vbox-extpack
Install the downloaded extension pack:
sudo vboxmanage extpack install Oracle_VM_VirtualBox_Extension_Pack-6.1.16.vbox-extpack
How to configure the VirtualBox server for remote connections
Next, we’ll configure remote connections to the headless VirtualBox server. Create a new configuration file with the command:
sudo nano /etc/default/virtualbox
In that file, add the following:
VBOXWEB_USER=user
VBOXWEB_PASSWD=password
VBOXWEB_TIMEOUT=0
VBOXWEB_HOST=server
Where:
-
user is the username that belongs to the vboxusers group
-
password is a password to be used (make it strong and unique)
-
server is the IP address of the VirtualBox headless server
Save and close the file.
How to install RemoteBox
Download the RemoteBox file with the command:
wget http://remotebox.knobgoblin.org.uk/downloads/RemoteBox-2.7.tar.bz2
Uncompress the file with the command:
bunzip2 RemoteBox-2.7.tar.bz2
Unpack the tar file with the command:
tar xvf RemoteBox-2.7.tar
How to run RemoteBox and connect it to VirtualBox
With everything in place, we can start RemoteBox and connect it to our Headless VirtualBox server. Change into the RemoteBox folder with the command:
cd RemoteBox-2.7
Start RemoteBox with the command:
./remotebox
When the GUI opens, click Connect and fill out the necessary information for your VirtualBox headless server (Figure A).
Figure A
” data-credit rel=”noopener noreferrer nofollow”>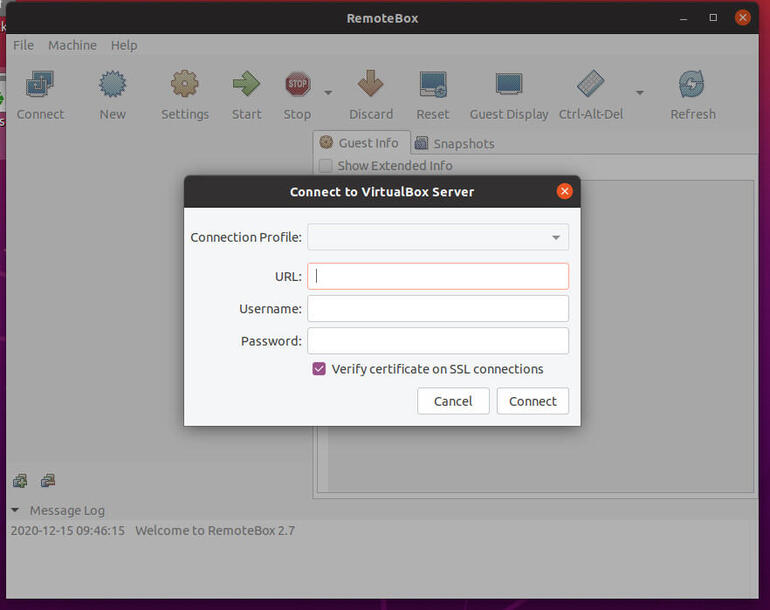
Making the connection to the headless VirtualBox server.
Use the credentials you configured in the /etc/default/virtualbox file for the login.
Once you’re successfully connected, you can create a new virtual machine in the same way you do from the standard VirtualBox GUI tool.
Congratulations, you can now more easily manage your VirtualBox VMs remotely. Your data center (and those who administer the associated virtual machines within) will thank you for it.
Subscribe to TechRepublic’s How To Make Tech Work on YouTube for all the latest tech advice for business pros from Jack Wallen.

Data Center Trends Newsletter
DevOps, virtualization, the hybrid cloud, storage, and operational efficiency are just some of the data center topics we’ll highlight. Delivered Mondays and Wednesdays
Also see
Source of Article


