
While you might be familiar with APIs, we’ll get into how they work and how they can be used in this tech project, using low-code programming to check the weather with your home lab.

Image: iStock/anyaberkut
If your experience marching up the leadership ranks was anything like mine, at some point, you may have had a micro-epiphany where you realized you were talking about a technology that you understood conceptually, but had never actually used in a hands-on manner. RESTful APIs (representational state transfer application programming interfaces) are one of those technologies for me.
SEE: COVID-19 workplace policy (TechRepublic Premium)
Editor’s note: This is the fourth in an ongoing series of tech projects for IT leaders. See Monday’s installment: How to build a home lab, Tuesday’s, Software for your home lab, Wednesday’s, How and why to add Node-RED to your home lab. Check out the next article Friday.
A RESTful API primer
The concept is simple enough. An application can “call” a special HTTP address to request or update information and receive a response to that request. RESTful APIs’ power lies in the fact that they hide or abstract the caller from knowing anything about the technology used to provide that response. If I invoke a RESTful API that sums two numbers, I don’t have to worry about whether that application is running on a custom supercomputer, a UNIX server, or even if it’s a dozen humans watching a screen and quickly keying in a response. Similarly, the API itself doesn’t need to factor in any of the technical considerations of the application that invokes it. The API developer supplies a set of expected parameters and results, and it doesn’t matter whether my application is in Python, C++ or using a testing tool like Postman. As long as I follow the documentation and supply the proper parameters, I’ll get a response from the API.
SEE: 10 things you should do to write effective RESTful Web services (TechRepublic)
As you might imagine, having access to millions of APIs, many accessible for free over the internet, allows people to create new tools and applications quickly and easily by using these pre-existing APIs.
How to use an API
For this tech project, we’ll use Node-RED, since it provides an excellent visual interface, and we’ll create a simple Node-RED flow that determines whether we need a jacket for the day. You could easily “wire” this flow to a multi-color light bulb to indicate whether you need your jacket, a voice assistant, or something like Pushover to send a notification to your phone each morning. If you haven’t followed the Home Lab project, or don’t have access to Node-RED, there are dozens of tools that let you interact with RESTful APIs, ranging from the Google Chrome web browser, to the aforementioned Postman tool.
SEE: Calling RESTful services from your Android app (TechRepublic)
The first step in using a RESTful API is to find which one you’d like to use. A Google search is usually a good starting point, and a quick search for “free weather API” led me to Open Weather Map. Most public APIs require an access key. These keys track your use of the API, and after a set number of API uses or “hits,” may require payment. The payment thresholds are usually high enough that you can experiment and use most public APIs for personal projects without incurring any cost. Once you create an account and verify your email address, you’ll receive an API key in your inbox.
Most APIs specify an endpoint address, which is the URL that you use to invoke the API, and a list of the parameters that are required, and the data that are returned. We’ll use the Current Weather endpoint from Open Weather Map, which is on the site.
How to connect things in Node-RED
Node-RED alleviates the setup behind API-driven applications and is a great way to incorporate APIs into your home automation routines, or a “sketchpad” to test logic you might want to build into anything from a new Amazon Alexa skill to a mobile application. In this case, we’ll start by dropping an “http request” node into a new flow. This node allows you to call any RESTful API, and will provide the results for further processing.
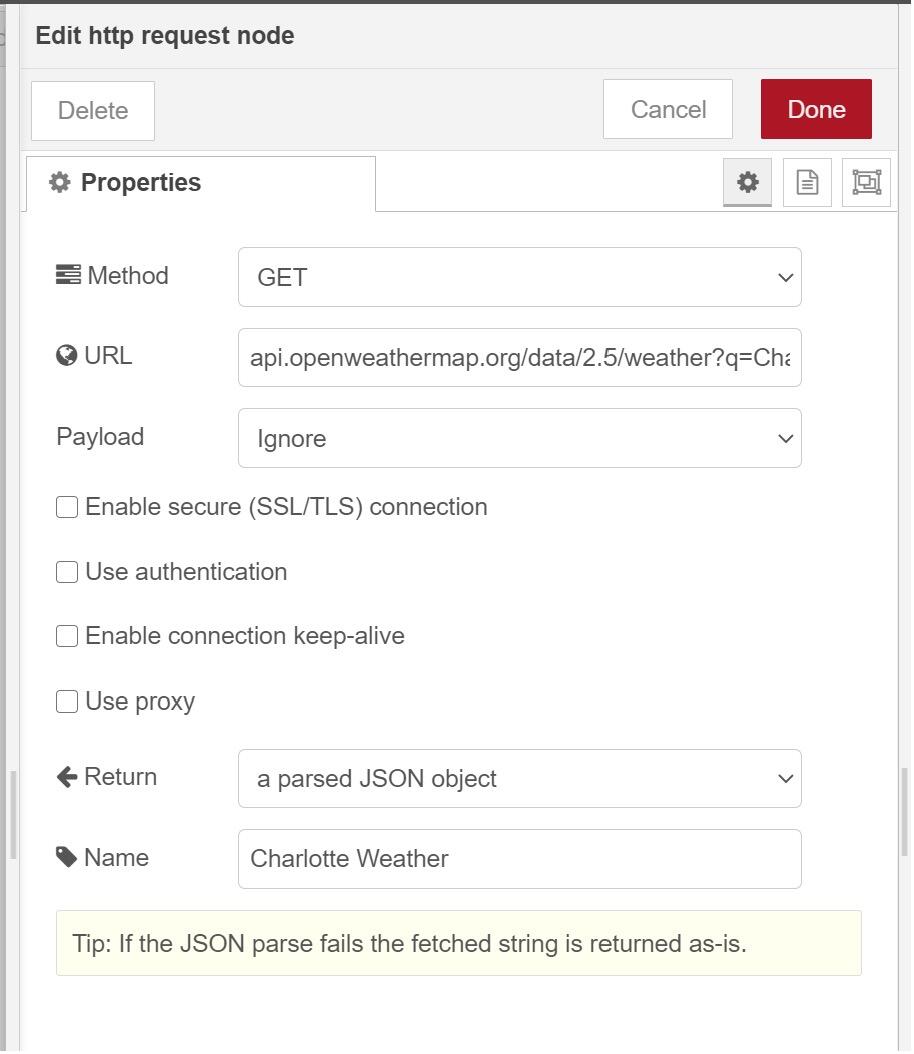
By double-clicking the node, you’ll see its parameters. The Method selection allows you to select how you’ll interact with the API, many of which provide CRUD (create, read, update, delete) functionality. Unfortunately, we can’t create or delete the current weather, so we’ll stick with the GET method.
The URL is the address of the API and the parameters we wish to supply. From the documentation on Open Weather Map, the URL looks like this:
api.openweathermap.org/data/2.5/weather?q={city name}&appid={API key}
We need to replace the city name and API key with parameters that tell the API which city we’d like to get weather for, and our API key. In my case, to find the weather for Charlotte, the URL looks like this (using a dummy key):
api.openweathermap.org/data/2.5/weather?q=Charlotte, NC, US&appid=123456
I’ll paste this into the “URL” field of my node. The next key element is the Return field, which specifies how Node-RED will process the API’s response. Generally, the option for “a parsed JSON object” is the right choice. JSON (JavaScript object notation) will return data from an API in a structured format that allows you to manipulate the data and send it to other nodes. Give the node a name, and click Done to close the parameters. In my case, the node looks like Figure A.
Figure A
Your http request node probably looks rather lonely, and if you’re new to Node-RED, you may be wondering how to activate it. You’ll notice that nodes have a connector on the left (input) and/or right (output) side, and our http request node has both. This means it needs a trigger on the left side to activate the node, which will then pass a result out the right side of the node. Much like flowcharts require connections to depict how data flows, so, too, does Node-RED use connectors to direct data through the flow.
For testing, the simplest trigger is an Inject node, which sends a timestamp when you press the square on the left side. The simplest output is a Debug node, which displays whatever data it receives. If I add these two nodes, and wire them together by connecting the connectors, I now have a simple, functional Node-RED flow, shown in Figure B:
Figure B
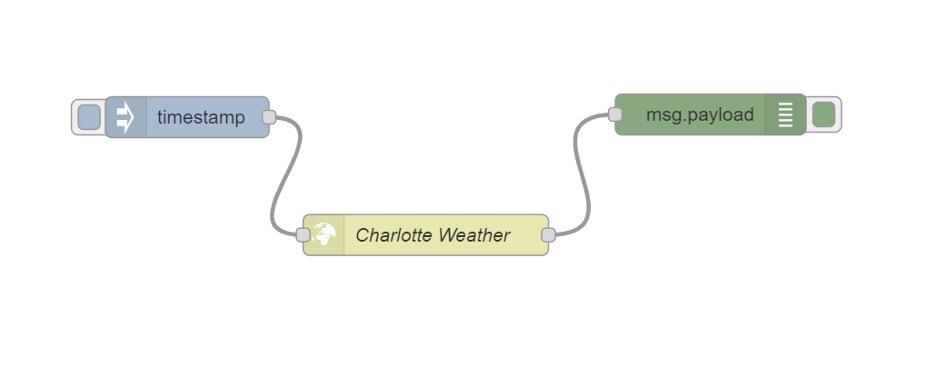
With these changes in place, click the red Deploy button on the upper right of the Node-RED window. This saves your changes to the server and allows you to test your flow.
To test the flow, I can open the Debug tab in the menu on the right by clicking the small Bug icon. With the Debug panel open, clicking the button on the timestamp node will result in an output from our API, which is displayed as an Object. For those who are unfamiliar, an Object is a collection of related parts that are organized by the person that designed the object. For example, I might have a Bicycle object that contains Wheels and Chain. Each of these objects could be further broken down. For instance, our Wheel object could have Spokes, Tire and Tube objects. This is a foundational element of modern applications, and Node-RED allows us to easily view and access these objects.
In Node-RED, nodes generally create a message Object and store their data in a payload, hence the debug node showing “msg.payload” as its description. In this case, msg.payload contains a weather object based on the API documentation from Open Weather, and clicking the Expand icon allows us to see all the data provided by Open Weather (Figure C):
Figure C
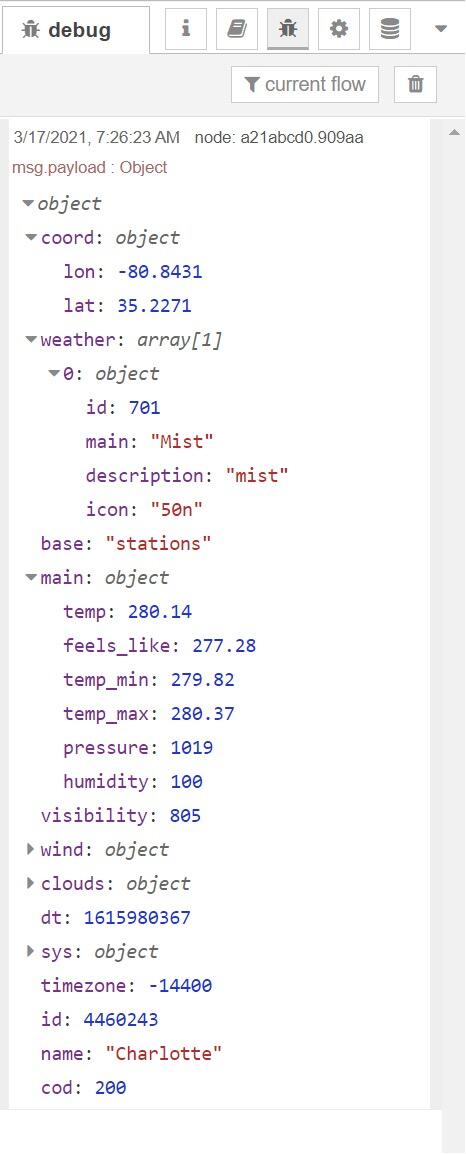
Hopefully, merely browsing the different parts of the object should start to demonstrate the power of APIs: With a couple of minutes of searching and a relatively simple HTTP URL, we were able to access a rich set of data about the current weather at a location of our choosing. APIs exist for everything from population and demographic data provided by local and national governments to package tracking, allowing developers to quickly build new functionality by connecting different APIs. In the next installment on Friday, we’ll use the API data to make a decision.

Executive Briefing Newsletter
Discover the secrets to IT leadership success with these tips on project management, budgets, and dealing with day-to-day challenges. Delivered Tuesdays and Thursdays
Also see
Source of Article


