AirDropping files to others means following the first etiquette rule: ensuring your name is both professional and accurate so it’s easy to find it in a list of nearby devices.
AirDrop is a very useful and safe feature that enables instant exchange of files and data between Apple devices. It is fast and requires a few steps to set up, and perhaps most importantly, it doesn’t degrade the quality of any media that is sent.
It can be important to change the name that identifies you when you send an AirDrop request to ensure your name is both professional and recognizable. This also helps ensure that your request can be accepted by the receiving party. In this article, we’ll look at ways to change the AirDrop name in the latest versions of iOS, iPadOS and macOS.
Jump to:
What you’ll need
Every time someone wants to send files to your device, they have to select your AirDrop name on their screen from a list of potential nearby devices. This can be a problem, especially when there are other Apple device users around you with the same default AirDrop name crowding out your own.
To change your AirDrop name, you need to change the name of your Apple device. First, ensure your Apple device is AirDrop-compatible. AirDrop is available on iPhones and iPads running iOS 7 or later, and it’s supported by Macs and MacBooks released in 2012 or later that run at least OS X Yosemite.
You should also ensure you are using the most recent version of the software, such as iOS 17 and macOS Sonoma. New versions of operating systems can sometimes cause compatibility issues, so you’ll want to try and be on the same OS version as the person you’re AirDropping with.
How to change your AirDrop name on an iPhone or iPad
Changing your AirDrop name in iOS or iPadOS is simple:
- Open the Settings app on your iPhone or iPad
- Select the General section.
- Tap About.
- Tap into the Name field, and delete the old name. Then, type what you’d like to be viewed as on AirDrop (Figure A).
Figure A

- Tap Done to rename the device
Your device name, and thus your AirDrop name, should now be changed, and you can go back and close the Settings app.
How to change your AirDrop name on a Mac
The steps to set or change your AirDrop name on Mac are just as quick and easy as they are on an iPhone or iPad:
- Select the Apple logo in the top left corner of the screen, and select System Settings.
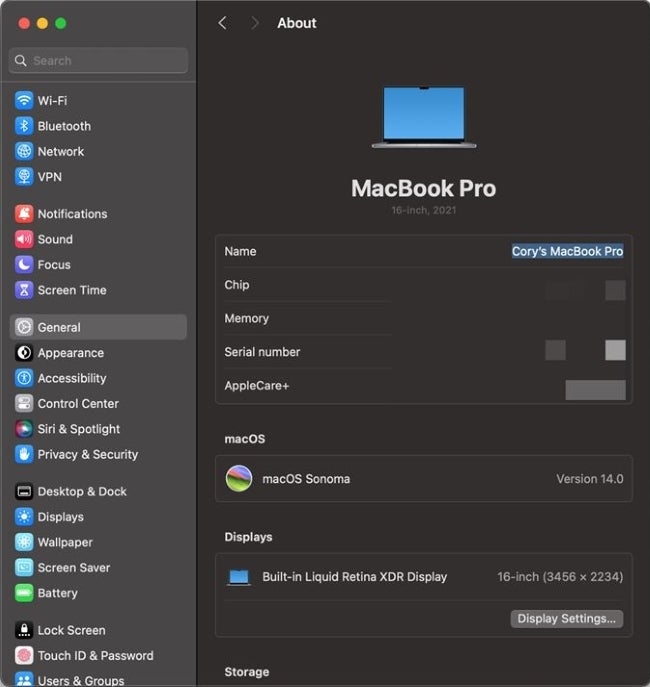
- Navigate to General > About.
- Click into the Name field, and begin typing the new name you wish to use for the device. Note that you’ll be required to verify your account by entering your password or scanning with Touch ID to verify (Figure B).
Figure B

- Tap the Back button when done to save the name.
What to do if your device isn’t displaying the new AirDrop name
In some instances, you may notice that the newly updated name doesn’t appear even after following all of the steps. In that case, try doing the steps again to ensure you did it correctly.
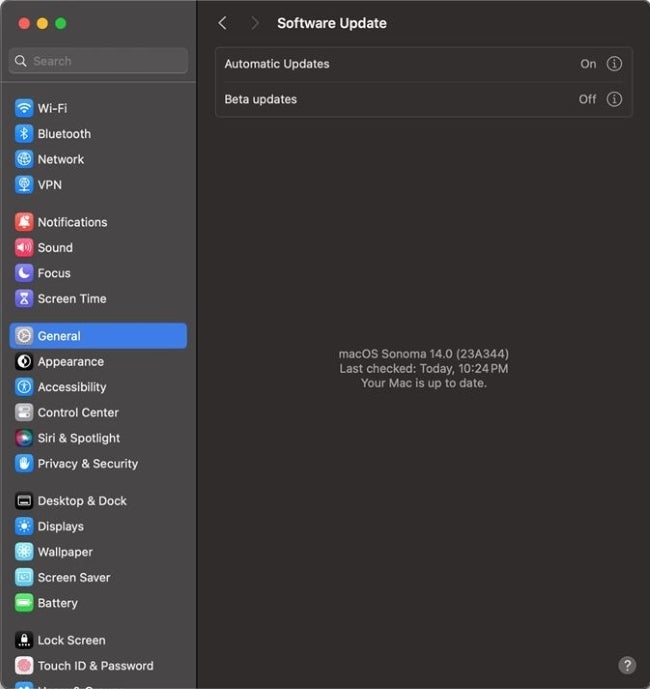
If the name still doesn’t update, verify that your device is running the latest version of AirDrop software. You can do this by:
- Open the Settings app on your iPhone or iPad or the System Settings on your Mac.
- Select General > Software Update (Figure C).
Figure C

If the AirDrop name is still not updated, try turning your device off and then turning it back on immediately after changing the name. The new AirDrop name should be updated.
Now, when other Apple users try to send something to your device, they’ll see the new AirDrop name you’ve created.
Ready to start sharing?
AirDrop can be incredibly handy for sharing files between Apple devices. But, that’s only if you can differentiate yours from the many Apple users that may share the same default AirDrop name around you. Now that you’ve changed your name in AirDrop, it can make it easier for others to discover you.
When you’re ready to start sharing, ensure that you make your device discoverable in AirDrop if you’re running iOS 16.2 or later.
Source of Article


