
Learn how to create a summary slide that you can add to the end of a presentation to support a Q&A session with your audience using older stand-alone versions of PowerPoint and Microsoft 365.
Adding a summary slide to the end of a PowerPoint presentation is a good idea. That way, you can review items with your audience at the end of the presentation. The presenter controls what items make it to the summary slide and can even use each item on the slide to quickly return to the previous slide(s).
Jump to:
How to create a summary slide in PowerPoint
If you’re using an older version of PowerPoint (pre-Microsoft 365), you can create a summary slide as follows:
1. Select all of the slides you want to summarize in Slide Sorter view. Click the first slide, then press and hold the Ctrl key as you click the remaining slides (Figure A).
Figure A

2. Click Summary Slide on the Outlining toolbar.
3. PowerPoint inserts the summary slide before the slides, so be sure to drag it to the end of the presentation.
When you’re done with the presentation, you can click to the summary slide for a brief period of questions and answers, if appropriate.
SEE: Spice up your presentation by adding multiple flashing stars in a PowerPoint slide.
How to hyperlink summary items
If that’s the end of things, then the simple summary slide is adequate. However, you might want to display the original slides again as you answer questions from the audience. If that’s a possibility, hyperlink the summary items to their respective slides as follows:
1. Select the item on the summary slide.
2. Choose Hyperlink from the Insert menu.
3. Click Place In This Document in the left pane.
4. Identify the slide (Figure B).
Figure B

5. Click OK.
You don’t have to hyperlink the items on the summary slide, but doing so lets you return to the original slide(s) with a quick click. You’ll probably want to add hyperlinks on each slide for the return trip to the summary slide.
SEE: Here’s how to tone down a busy picture using Merge in Microsoft PowerPoint.
How to insert a Zoom summary slide in Microsoft 365
If you’re using Microsoft 365, adding a summary slide is easier. Thanks to the Zoom feature, PowerPoint will generate a summary slide, but how you use it differs a bit from the older summary slide. There are no hyperlinks per se; clicking a thumbnail will zoom in on the original slide.
Let’s create a summary slide that includes the same slides 1, 3 and 5 using the Zoom feature:
1. Click the Insert tab.
2. In the Links group, choose Summary Zoom from the Zoom dropdown (Figure C).
Figure C

3. In the resulting pane, click slides 1, 3 and 5 (Figure D). If you select slides before starting this process, they will already be selected.
Figure D
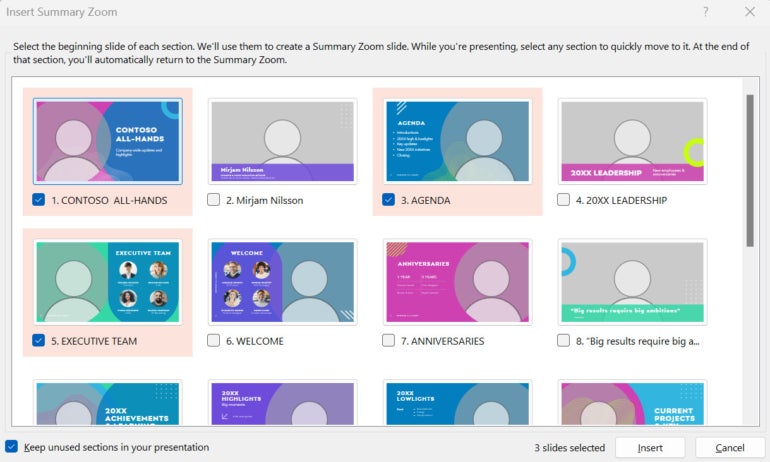
4. Click Insert.
Figure E shows the resulting summary slide, which includes thumbnails of slides 1, 3 and 5. PowerPoint displays the summary slide at the beginning of the presentation, so remember to drag it to the end.
Figure E

How to use the Zoom summary slide
To use the summary slide, simply click any thumbnail to zoom in on that slide. You’re not actually moving to that slide. What happens with the next click is where sections matter.
In Figure C, you can see two dimmed options. Section Slide is dimmed because the current presentation has no sections. When you apply the Zoom summary slide, PowerPoint automatically divides your slides into sections. How you intend to use the summary slide will determine whether you keep the new sections. The Zoom feature works well with sections, but they’re not required.
SEE: Create a moving arrow in Microsoft PowerPoint to gently guide the presentation from point to point.
If the presentation has sections, the second click will zoom in on the section slide in that section. Each subsequent click will display the next slide in the section until you reach the end of the section. Once you’ve reached that point, a click will return the presentation to the summary slide.
If the presentation doesn’t use sections or the section has only one slide, the first click zooms in on the appropriate slide. The second click returns you to the summary slide.
How to remove a section
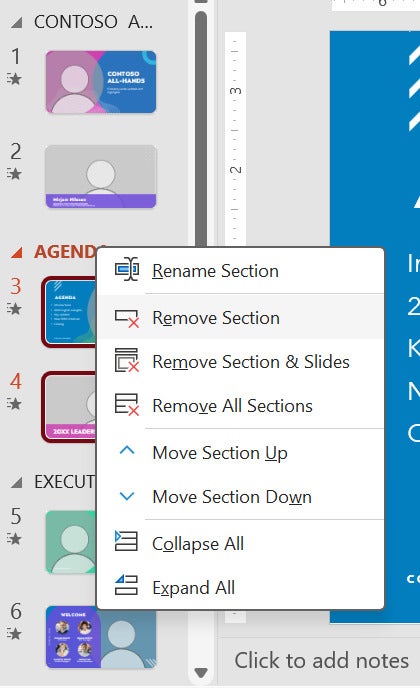
There’s no way to stop PowerPoint from adding sections once you implement the Zoom slide feature. Fortunately, removing the sections is easy:
1. Right-click the section item.
2. Choose Remove Section (Figure F).
Figure F
Source of Article


