Microsoft Excel users, follow these two easy methods to reduce data entry time and errors when customized features aren’t available.

Image: PixieMe/Shutterstock
Your summarizations, analyses, projections, reports and so on, are only as good as your data. It’s important that you use every resource available to protect the validity of the data, which means you can spend a lot of time creating an app that’s nearly foolproof. Fortunately for us, not every spreadsheet needs that kind of protection and when that happens, there are automated features in Microsoft Excel that help protect data. In this article, I’ll show you two quick and easy data entry tricks that will reduce typos the same way customization will, but without the extra work.
SEE: 69 Excel tips every user should master (TechRepublic)
I’m using Microsoft 365 on a Windows 10 64-bit system, but you can work with earlier versions. You can use the demonstration downloadable .xlsx or .xls file or work with your own data. AutoComplete works in the online version but the pick list doesn’t
How to use AutoComplete in Excel
The term AutoComplete shows up often in feature lists—it’s easy to guess what it does even if you’re not familiar with it in Excel. This feature kicks in as soon as you enter contiguous values, in any direction. Even if you’re familiar with AutoComplete, I’ll bet you didn’t now that last part. The feature is extremely versatile.
Here’s how AutoComplete works in Excel: When you enter a character that matches an existing value in a contiguous range, this feature will display matching values. As long as there’s a bit of ambiguity, you have to keep entering characters. Let’s run a couple of examples though the simple sheet in Figure A.
Figure A
” data-credit>
Use AutoComplete with a list of names.
First, enter the letter D in cell B8 and watch what happens. As shown in Figure A, AutoComplete completes the entry based on the previously entered values (the values above B8). The entry Denise matches the character D, and because no other existing entry also matches the letter D, AutoComplete suggests Denise. To enter Denise, press Enter (or Tab if you want to move to the next column instead of moving down to the next row). To reject the suggested entry, keep typing. Press Escape to remove everything, including the D you typed.
Let’s try another example, this time type Su. Were you expecting something? In this case, AutoComplete does nothing because there aren’t enough characters to select Susan or Sue. If you enter S, AutoComplete offers Susan. If you enter e, AutoComplete does nothing.
SEE: Windows 10: Lists of vocal commands for speech recognition and dictation (free PDF) (TechRepublic)
Try entering a value to the right, left, and even above. This feature will work in all four directions.
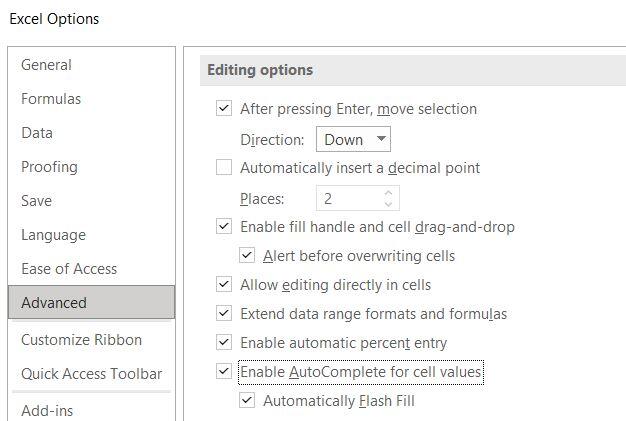
To disable AutoComplete, click the File menu and choose Options (or More if you don’t see Options). Choose Advanced in the left pane. In the Editing Option section, uncheck the Enable AutoComplete for Cell Values option shown in Figure B. Unfortunately, doing so also disables Flash Fill, which is a powerful tool that you’ll probably want to keep. To learn more about using Flash Fill, read 6 ways to save time using Flash Fill in Microsoft Excel.
Figure B
” data-credit>
You can disable this feature but doing so also disables Flash Fill.
Sometimes you won’t want a match. Instead, you’ll want to see a unique list. When this is the case use a pick list.
How to use a pick list in Excel
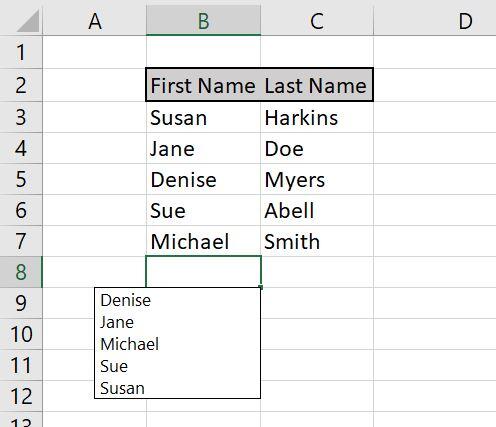
When entering contiguous values in a single column, you can also use a pick list—a built-in feature that displays a unique list of existing values. It’s similar to a dropdown list but it’s completely automated. The only thing you must do is press Alt + Down Arrow to see it. Then, select an item in the list to populate the active cell. Let’s try it! Select B8 and press Alt + Down Arrow to see the pick list shown in Figure C.
Figure C
” data-credit>
Display a column’s pick list by pressing Alt + Down Arrow.
If the active cell has content, this feature will write over it if you select a list item. Remember that you can use Ctrl + z to undo that action. You can display the pick list above the list, but not to the right or left, even if multiple value exists in those directions.
Neither feature will keep you or a user from choosing a wrong value, but you’ll be increasing productivity a a bit and avoiding typos. If you’d like to learn more Excel data entry tricks, read How to reduce data input and typos in Excel.
Also see
Source of Article


