
For many, Docker has been the container runtime for years. It’s simple to use and has plenty of third-party tools available to make it more efficient and accessible. Of course, Docker isn’t the only option. And if your host operating system of choice is of the Red Hat Enterprise Linux variety, such as RHEL, Rocky Linux or AlmaLinux, Docker has been replaced by Podman.
SEE: Hiring kit: Back-end Developer (TechRepublic Premium)
The good news is that Podman is similar to Docker, especially when it comes to basic usage. One thing to keep in mind is that Podman doesn’t have an equivalent to Docker Swarm, other than Kubernetes and Nomad, which aren’t nearly as simple to deploy and use as Swarm.
With Podman, you can do many of the same things as with Docker. And that’s what I’m going to show you now. We’ll take our first steps with Podman, so you can feel more comfortable using this runtime engine.
What you’ll need to get started with Podman
First, you’ll need a Linux distribution that supports Podman. RHEL-based distributions, such as Rocky Linux and AlmaLinux, ship with Podman installed by default. If Ubuntu-based distributions are more to your liking, you can always install Podman fairly easily. I will assume you are using either a distribution that ships with Podman or have installed Podman on your Ubuntu-based distribution of choice.
With that said, let’s get to work.
How to search for and pull an image
You remember how to pull an image with Docker, right? Does docker pull nginx:latest ring a bell? With Podman it’s the very same. Before we pull an image, let’s run a search and see what NGINX images are available. To do this, issue the command:
podman search nginx
You should see several entries from both Docker Hub and the redhat.io registry. Of those entries will be included the latest official NGINX images, which should be listed as docker.io/library/nginx. To pull that image, you’d issue the command:
podman pull nginx:latest
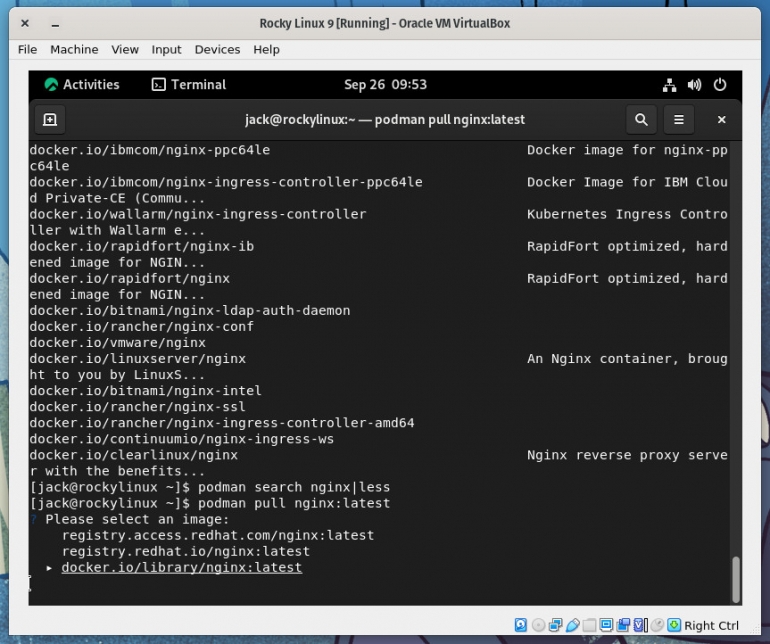
This is where one of the first differences between Docker and Podman will appear. When you pull that image with Docker, it will simply default to pulling from docker.io. With Podman, it will give you the choice of pulling from registry.access.redhat.com, registry.redhat.io or docker.io (Figure A). You must then select which registry to pull from using the cursor keys, and accept the choice by hitting Enter on your keyboard.
Figure A
To verify the image was pulled, issue the command:
podman images
You should see your newly-pulled image listed.
Let’s now deploy a container with our newly-pulled image.
How to deploy a container with Podman
With Docker, deploying a container from a saved image is as simple as:
docker run –name docker-nginx -p 8080:80 -d nginx
Podman offers a very similar deployment command, which looks like this:
podman run --name podman-nginx -p 8080:80 -d nginx
Let’s break that command down:
- podman is the container runtime engine command.
- –name gives our container a unique name. If you skip this, Podman will assign a random name.
- -p tells podman you are going to define the port to be used.
- 8080:80 tells podman to use 8080 as the external port (to the container) and map it to internal port 80.
- -d runs the container in detached mode, so your bash prompt is returned.
- nginx is the image to be used for the container.
To verify a successful deployment in Docker, you’d issue the command:
docker ps -a
With Podman, the command is similar:
podman ps -a
You should see your newly-deployed container up and running.
How to stop and remove containers with Podman
Just like with Docker, when you deploy a Podman container, you will see a string of characters that serve as the container ID. To stop that container, you only need to use the first four characters in that ID, as in:
podman stop b529
To completely remove the container, the command would be:
podman rm b529
Had you only stopped the container and not deleted it, you could restart it like so:
podman restart b529
The above commands are all similar to the Docker environment.
How to access a running container
With Docker, you can access the bash prompt of a currently running container with a command like:
docker exec -it docker-nginx /bin/bash
The above command would land you in the bash prompt of the container named docker-nginx. To do this with Podman is the very same and looks like this:
podman exec -it podman-nginx /bin/bash
You should now see something like this:
root@b529f338ed24:/#
You can then exit out of the container with the exit command.
And that is how you take your first steps with the Podman container runtime engine. Simply put, if you can use Docker, you can use Podman with very little work. Next time, we’ll create and manage volumes with Podman.
Subscribe to TechRepublic’s How To Make Tech Work on YouTube for all the latest tech advice for business pros from Jack Wallen.
Source of Article


