If you need to get Nextcloud up and running fast, and you need built-in SSL support, the best route for you might be installing via snap packages.

Image: Jack Wallen
I use Nextcloud for any cloud services that are not tied to Google and it’s worked like an absolute champ. But for those who don’t want to go through the regular process of installing this powerful on-premises cloud solution, what do you do?
You can always turn to snap packages. With snap, Nextcloud can be installed in, well, a snap. To make matters even better, you can add SSL into the mix with ease.
That’s exactly what I’m going to do, show you how to install Nextcloud with SSL support, on Ubuntu Server.
SEE: Serverless computing: A guide for IT leaders (TechRepublic Premium)
The only caveat to this method is that you’ll be installing a version of Nextcloud that’s out of date. As of this writing, the latest release of Nextcloud is 18 and the snap version is 17.0.5. However, if you don’t need the latest features (such as built-in video chat), and you really only need the standard cloud-based features, installing Nextcloud this way is incredibly easy.
If you’d prefer to get the latest version of Nextcloud, check out my tutorial: How to install Nextcloud 18 on Ubuntu Server .
What you’ll need
-
A running, updated instance of Ubuntu Server–any release that supports snap
-
A user with sudo privilege
How to install Nextcloud with snap
The first thing we must do is install Nextcloud with snap. To do this, log in to your Ubuntu server and issue the command:
sudo snap install nextcloud
This installation can take a bit of time (less than 5 minutes).
Once the installation completes, point a browser to:
http://SERVER_IP/
Where SERVER_IP is the IP address of your hosting server.
You will be greeted by the Create Admin Account window (Figure A).
Figure A
” data-credit rel=”noopener noreferrer nofollow”>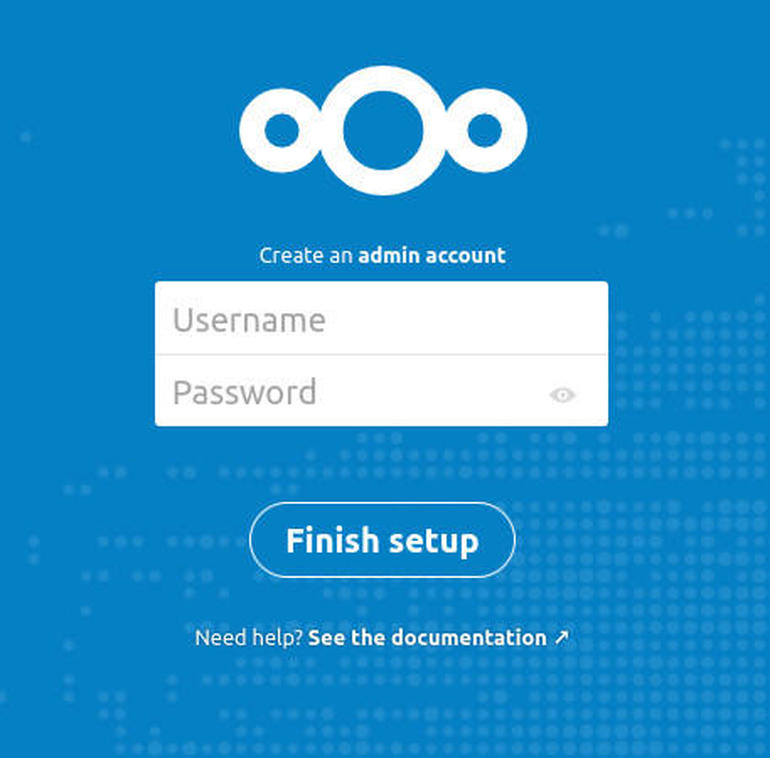
Creating an admin account for your snap-installed instance of Nextcloud.
Type a username and a password and then click Finish Setup.
Once the installation completes, you’ll be presented with your newly-installed Nextcloud instance.
How to install SSL support
Next, we’re going to add SSL support to the installation. You can go two routes with this—either install an SSL certificate from Letsencrypt or install a self-signed certificate. If this is for testing purposes or internal use only, you can add SSL self-signed support with the command:
sudo nextcloud.enable-https self-signed
If you want to use a trusted certificate, and your Nextcloud instance is WAN-facing (with a valid domain name), you can install SSL with Letsencrypt with the command:
sudo nextcloud.enable-https lets-encrypt
Once either of those commands complete, Apache will restart and you should be able to reach Nextcloud with the address:
https://SERVER_IP
Where SERVER_IP is the IP address of your hosting server.
And that’s all there is to installing Nextcloud with SSL using snap. Without a doubt, this is the fastest method of getting Nextcloud up and running.

Cloud and Everything as a Service Newsletter
This is your go-to resource for XaaS, AWS, Microsoft Azure, Google Cloud Platform, cloud engineering jobs, and cloud security news and tips. Delivered Mondays
Also see
Source of Article