Jack Wallen walks you through the process of installing an identity and authorization platform on CentOS 8.

Image: CentOS
FreeIPA is an open source identity and authorization platform that provides centralized authorization for Linux, macOS, and Windows. This solution is based on the 389 Directory Server and uses Kerberos, SSSD, Dogtag, NTP, and DNS. The installation isn’t terribly challenging, and you’ll find a handy web-based interface that makes the platform easy to administer.
I’m going to walk you through the steps of getting FreeIPA up and running on CentOS 8.
SEE: CentOS: A how-to guide (free PDF) (TechRepublic)
What you’ll need
How to set your hostname
The first thing you must do is set your hostname. I’m going to be demonstrating with a LAN-only FQDN (which then must be mapped in /etc/hosts on any client machine that wants to access the server).
Set your hostname with the command:
sudo hostnamectl set-hostname HOSTNAME
Where HOSTNAME is the FQDN of the server.
After you’ve set the hostname, you must add an entry in the server’s hosts file. Issue the command:
sudo nano /etc/hosts
Add a line at the bottom like this:
SERVER_IP HOSTNAME
Where SERVER_IP is the IP address of the server and HOSTNAME is the FQDN of the server.
Save and close the file.
How to install FreeIPA
The installation of FreeIPA starts with enabling the idm:DL1 repository with the command:
sudo module enable idm:DL1
When that command completes, sync the repository with the command:
sudo dnf distro-sync
Install FreeIPA with the command:
sudo dnf install ipa-server ipa-server-dns -y
How to set up FreeIPA Server
Next you have to run the configuration script for FreeIPA Server. To do that, issue the command:
sudo ipa-server-install
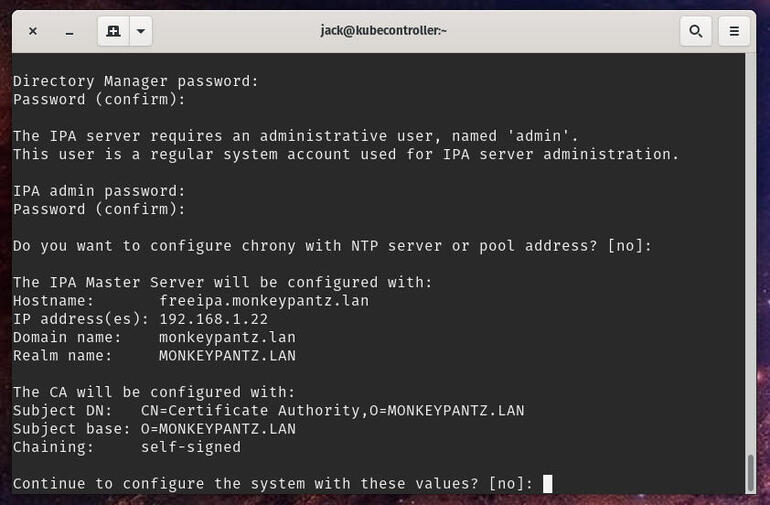
The first question you must answer is whether or not you want to install BIND for DNS. Accept the default (no) by pressing Enter on your keyboard. You must then confirm the domain and realm name, which will both be detected by the script. Once you’ve confirmed those entries, you’ll need to set a directory manager password, an IPA admin password for the web interface, and then accept the default (no) for the installation of chrony.
After you’ve taken care of the above, you’ll be presented with the details of your installation (Figure A).
Figure A
” data-credit rel=”noopener noreferrer nofollow”>
The details of my installation of FreeIPA Server.
Type y and hit Enter on your keyboard. The configuration will begin. This does take a bit of time, so either sit back and watch the text fly by or set about to take care of another task.
When the configuration completes, you’re ready to continue on.
How to access the web interface
Open a browser and point it to https://SERVER_IP (where SERVER IP is the IP address of the hosting server). You should be prompted for a username and password (Figure B). The username is admin and the password is the one you set for IPA admin during the configuration.
Figure B
” data-credit rel=”noopener noreferrer nofollow”>
The FreeIPA login screen.
Upon successful login, you’ll find yourself at the FreeIPA main window, where you can begin managing your centralized authentication server (Figure C).
Figure C
” data-credit rel=”noopener noreferrer nofollow”>
The FreeIPA main window is ready to work.
And that’s all there is to getting FreeIPA installed on CentOS. You can now spend some time adding users and other bits to make your identity and authorization solution work for your business.
Also see
Source of Article


