Looking to develop and consume your own custom APIs? Strapi might be the tool for you. Learn how to quickly spin up this developer-centric CMS tool.

Image: iStockphoto/DragonImages
Strapi is a cross between a content management system (CMS) and a Node.js framework. With this headless tool running in your data center, you’ll save weeks of API development time. Strapi offers only the basic functionalities for managing content and users, while allowing you to manage and share that content via REST or GraphQL.
Features of Strapi include:
-
Fully open source
-
Get started with development in just a few minutes
-
GraphQL support built in
-
Easy API permission management
-
Easy handling of relations between data within the Strapi instance
-
Easily customizable
I’m going to walk you through a quick installation of the Strapi headless CMS tool. This method will allow you to create a project and then create content on a project-by-project basis. This will also allow you to quickly test Strapi to see if it’s the right tool for you.
Once you’ve made that decision, you can then move on to the full-blown installation (which we’ll walk through at a later time). However, with this method, you will have a 100% functioning instance of Strapi that you can use to build your own custom APIs.
I’ll be demonstrating on Ubuntu Server 18.04, but you can install this system on any platform that supports Node.js and npm.
SEE: 10 things companies are keeping in their own data centers (TechRepublic download)
What you’ll need
How to install the dependencies
The first thing we have to do is take care of the dependencies. Strapi requires Node.js version 10 or newer, so the first thing we’ll do is take care of that.
Log in to your Ubuntu server instance and install the initial dependencies by issuing the command:
sudo apt-get install build-essential apt-transport-https lsb-release ca-certificates curl -y
Once that completes, download and install Node.js version 12 with the command:
curl -sL https://deb.nodesource.com/setup_12.x | sudo -E bash -
When the Node.js installation completes, install npm with the command:
sudo apt-get install npm -y
Next, we need to install yarn, which will be used to run the Strapi instance. To do that, first download and add the necessary apt key with the command:
curl -sS https://dl.yarnpkg.com/debian/pubkey.gpg | sudo apt-key add -
Add the yarn repository with the command:
echo "deb https://dl.yarnpkg.com/debian/ stable main" | sudo tee /etc/apt/sources.list.d/yarn.list
Finally, install yarn with the command:
sudo apt update && sudo apt install yarn
When that completes, you’re ready to spin up an instance of Strapi.
How to run an instance of Strapi
Back at the command line, you’ll start an instance of Strapi (while also creating a new project) with the command:
yarn create strapi-app PROJECT_NAME --quickstart
Where PROJECT_NAME is the name of the project you want to create.
This will take a bit of time (between two to five minutes). Once it completes, you’ll be presented with a screen displaying the address for which you can reach the server (Figure A).
Figure A
” data-credit rel=”noopener noreferrer nofollow”>
The Strapi instance is running.
Thing about this is, it’s going to attempt to open a browser from that command. Since we’ve installed this on a GUI-less server, that’s not going to happen. So instead of pointing a browser to http://localhost:1337/admin, you’ll open a browser on another machine (one on your LAN) and point it to http://SERVER_IP:1337 (where SERVER_IP is the IP address of the server hosting Strapi). Do not add the /admin portion of the URL, as that will give you an error.
You should see a welcome screen, asking you to create an administrator (Figure B).
Figure B
” data-credit rel=”noopener noreferrer nofollow”>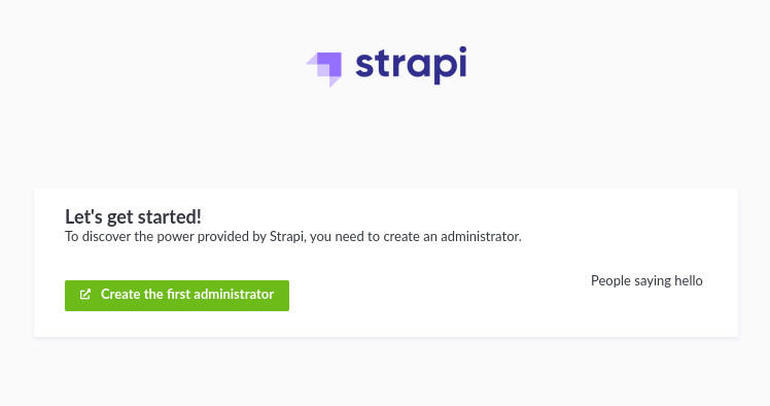
Welcome to Strapi and create your administrator.
Click Create The First Administrator. Fill out the necessary information and click Ready To Start (Figure C).
Figure C
” data-credit rel=”noopener noreferrer nofollow”>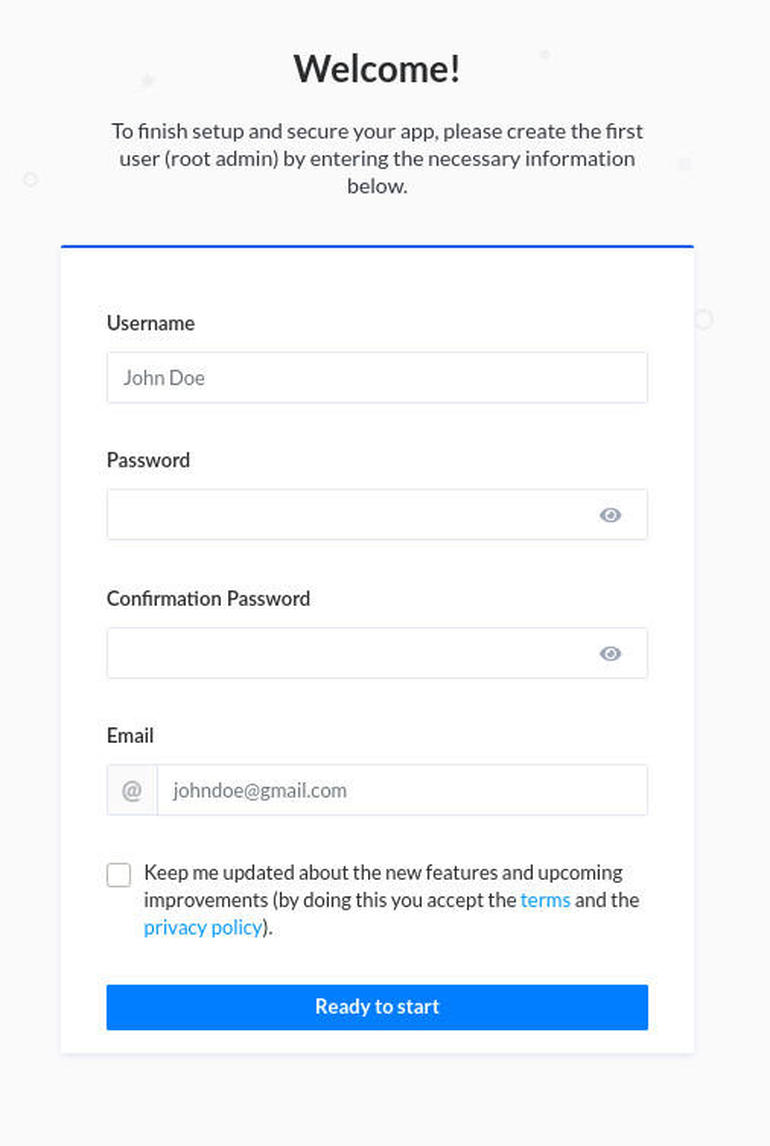
Creating the Strapi administrator.
You will then be greeted by the Strapi main window, where you can start building your first content (Figure D).
Figure D
” data-credit rel=”noopener noreferrer nofollow”>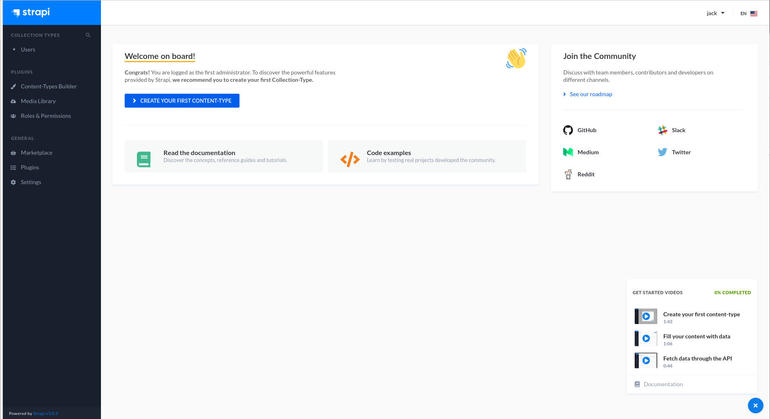
The Strapi main window.
Congratulations, you have Strapi up and running, where you can build and consume content. Just remember, your Strapi instance is still running in the terminal window. If you close out that terminal window, your Strapi server will stop running. So, when you want to use Strapi to create a new project, you’ll issue the yarn command to create it.
Note: Running Strapi in this manner requires you to keep Strapi up and running until you complete a project. You cannot start a project, close it out, and restart that same project. For that, Strapi needs to be installed as a stand-alone server, not spun up with yarn.
Next time around, we’ll install a full instance of Strapi that doesn’t depend on yarn and uses MongoDB as it’s database.

Data Center Trends Newsletter
DevOps, virtualization, the hybrid cloud, storage, and operational efficiency are just some of the data center topics we’ll highlight. Delivered Mondays and Wednesdays
Also see
Source of Article