Developers or non-developers, if you’re unsure how to use Git, we’ve got you covered. Take your first steps with this easy primer on using Git.

Image: Getty Images/iStockphoto
If you’re a developer, you probably know Git; in fact, you might even house a Git repository on one or more of your data center servers for in-house code. If so, your developer teams probably work like a well-oiled machine.
But for developers who have yet to work with Git, it can be a little daunting–especially when you come from a platform that doesn’t quite use commands as seamlessly as say, Linux. However, chances are, those new developers are going to have to get up to speed quickly with Git.
That’s where I come in. I’m going to walk you through the process of using Git, so those new to the tool can begin to use it immediately.
SEE: Implementing DevOps: A guide for IT pros (free PDF) (TechRepublic)
What you’ll need
The only thing you’ll need to make this work is a computer that supports the installation of Git. I’ll be demonstrating on Ubuntu Server 18.04.
How to install Git
On the off-chance Git isn’t installed, let’s make that happen. To install git on Ubuntu Server, log in to the machine and issue the command:
sudo apt-get install git -y
That’s all there to the installation.
How to create a local repository in Git
The first thing you’re going to want to do is create a local repository. This repository will house the code you work on, which you can then add your local repository to the remote, but that’s another topic for another time.
To create a local repository, let’s first create a directory. Back at the terminal window, issue the command:
mkdir ~/myproject
Change into that new directory with the command:
cd ~/myproject
We’re now going to initialize the repository with the command:
git init
Congratulations, you’ve initialized your first repository.
How to add a new file to the repository in Git
Our next step is to add a new file to the repository. Let’s say this is a brand new project. The first file you might want to add is one with your contact information. So create that new file with the command:
nano YOURNAME.txt
Where YOURNAME is actually your name.
In that file, add any contact information you might want to include. Save and close the file.
Let’s take a look at the status of our repository so far. To do that, issue the command:
git status
This will reveal that there are no commits (records of file changes) on the branch master (the main branch, where all branches stem), but there is an untracked file (Figure A).
Figure A
” data-credit rel=”noopener noreferrer nofollow”>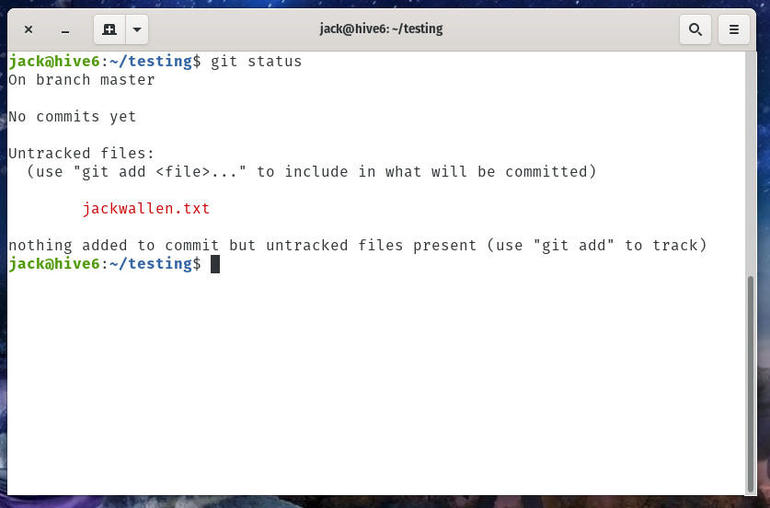
Our information file on the Git repository is untracked.
How to add a file in Git
What we need to do is add the new file to the branch master. When you add a new file or make changes to a file, Git will notice it, but won’t do anything with that information. To have Git do something with the file, you must add it to a commit. However, before you do that, you have to first add the file to the staging environment.
What is the staging environment? In simplest terms, the staging area is where files exist and you can work on them, before they are committed. Although Git might know about those files, it cannot do anything with them until you commit them.
The basic workflow goes something like this:
- You add or edit files in your local repository.
- You stage the files by preparing them for a commit.
- You issue a commit which takes the files in the staging area and stores a snapshot of them in Git directory.
So to add our user information file and make Git aware of it, issue the command:
git add YOURNAME.txt
Where YOURNAME is your name.
Now, if you issue the git status command, you’ll see that the file has been added (Figure B).
Figure B
” data-credit rel=”noopener noreferrer nofollow”>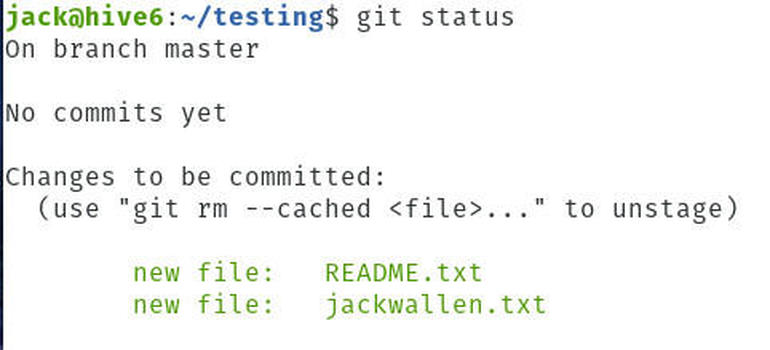
Our information file has been added.
Let’s create a README.txt file. Issue the command:
touch README.txt
Now, add that file with the command:
git add README.txt
You can also add all the files in the current working directory with the command:
git add .
Issue the git status command and you’ll see both files are ready for a commit (Figure C).
Figure C
” data-credit rel=”noopener noreferrer nofollow”>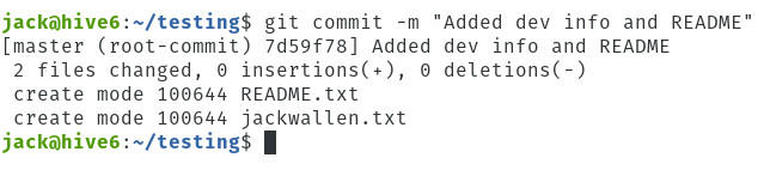
Two files in our repository are ready for a commit.
How to commit in Git
This is one of the most important steps you’ll take with Git. What you’re going to do is commit all of your changes to the local repository. When you create a commit, it will create a unique ID for the changes, so Git is aware of every change, made by every developer, at every stage of the project.
It’s also very important that, when you make a commit, you add informative text to the commit that lets everyone know what the commit did. So instead of adding the comment “meh” or “aja;sdjfa;dfkj” to this first commit, you might want to say something like Added Dev Info and README.
To do this, you would issue the command:
git commit -m "Added dev info and README"
When you do this, you’ll see that Git has accepted the commit and reported the changes (Figure D).
Figure D
” data-credit rel=”noopener noreferrer nofollow”>
Our git commit was successful.
Continue adding files and commits until your project directory contains everything you need.
How to create a branch in Git
We’re going to skip the part where you’ve worked diligently to develop your project and at this point you might have a working piece of software. What happens if you want to add a new feature, but don’t want to break the main project in doing so? For that, you can create a branch. Think of this as a sort of fork of the project, where you can work on the fork, while not changing the original project.
To create a branch of our project, issue the command:
git checkout -b BRANCHNAME
Where BRANCHNAME is the name of your new branch. Git will inform you that it has switched to the new branch. Git has created the new branch and checked it out for you. To verify the branch was created, issue the command:
git branch
You should now see Git listing the master and the new branch (Figure E).
Figure E
” data-credit rel=”noopener noreferrer nofollow”>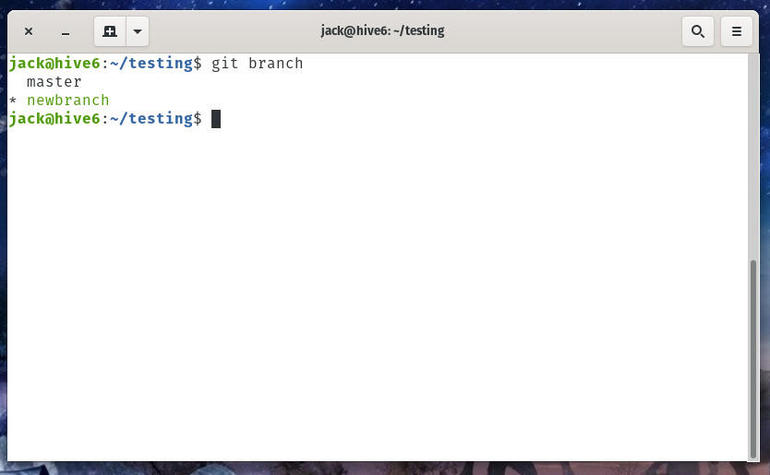
Our master and new branch are listed.
You can now work on your new branch, without that work affecting the original project.
Congratulations, you’ve taken your first steps with Git. The next time around, we’ll walk through the process of pushing that project to a remote repository. Until then, happy Git-ting.

Developer Essentials Newsletter
From the hottest programming languages to the jobs with the highest salaries, get the developer news and tips you need to know. Weekly
Also see
Source of Article