If your business needs an LDAP implementation, you can’t go wrong with the OpenLDAP/phpLDAPadmin combo. Jack Wallen helps you get it up and running.
Image: Jack Wallen
For many larger businesses, having the ability to use centralized authentication is a boon. For those businesses, Microsoft’s Active Directory is the first choice. When you need an easy way to integrate into Active Directory, you might want to turn to OpenLDAP, which is a protocol that many different directory services and access management solutions can work with and understand.
Features of OpenLDAP include:
-
Support for Simple Authentication and Security Layer and Transport Layer Security
-
Support for Internet Protocol version 6
-
Easy interaction with your in-house software
-
Full compliance with the LDAP Data Interchange Format version 1
-
Enhanced Stand-Alone LDAP Server mode
For those who don’t want to have to deal with administering OpenLDAP from the command line, there’s always phpLDAPadmin, a web-based tool for managing OpenLDAP.
I want to walk you through the process of getting both OpenLDAP and phpLDAPadmin up and running on Ubuntu Server 20.04.
SEE: MSP best practices: Server deployment checklist (TechRepublic Premium)
What you’ll need
- An upgraded instance of Ubuntu Server 20.04
- A user with sudo privileges
How to install OpenLDAP
The first thing we must do is install OpenLDAP. To do that, log in to your Ubuntu Server and issue the command:
sudo apt-get install slapd ldap-utils -y
During the installation, you’ll be asked to create an LDAP admin password. Type and verify a new password for the service and the installation will continue and complete.
When the installation completes, you need to run the configuration tool, so you can set your domain. To do that, issue the command:
sudo dpkg-reconfigure slapd
The first screen asks if you want to omit OpenLDAP server configuration. Accept the default (No) and hit Enter on your keyboard (Figure A).
Figure A
” data-credit rel=”noopener noreferrer nofollow”>
The first configuration screen for OpenLDAP.
In the next window, type the domain you wish to use (Figure B).
Figure B
” data-credit rel=”noopener noreferrer nofollow”>
Creating a domain for OpenLDAP on Ubuntu Server 20.04.
You will then need to create an organization name. For instance, if your domain is foo.com, your organization could be foo. Once you’ve done that, you’ll be asked to enter the password for the admin entry in the LDAP directory. After creating the new password, you’ll want to answer Yes to remove the database when slapd is purged.
That’s all there is to configuring OpenLDAP. To verify the configuration, issue the command:
slapcat
You should be presented with all of the information about your newly added domain (Figure C).
Figure C
” data-credit rel=”noopener noreferrer nofollow”>
Our newly added domain is configured and ready.
How to create OpenLDAP accounts
The next step is to create the organizational unit containers that will store information about users and groups. To do that, create a new ldif file with the command:
nano users-ou.ldif
The contents of this file will look like:
dn: ou=people,dc=hive,dc=lan
objectClass: organizationalUnit
objectClass: top
ou: people
dn: ou=groups,dc=hive,dc=lan objectClass: organizationalUnit
objectClass: top
ou: groups
Make sure to change dc=hive,dc=lan to match your domain.
Save and close the file.
Next, we create a file that will adjust the SLAPD database access controls with the command:
nano update-mdb-acl.ldif
In that file, paste the following, (making sure to change hive and lan with your domain information):
n: olcDatabase={1}mdb,cn=config
changetype: modify
replace: olcAccess
olcAccess: to attrs=userPassword,shadowLastChange,shadowExpire by self write by anonymous auth by dn.subtree="gidNumber=0+uidNumber=0,cn=peercred,cn=external,cn=auth" manage by dn.exact="cn=readonly,ou=people,dc=hive,dc=lan" read by * none
olcAccess: to dn.exact="cn=readonly,ou=people,dc=hive,dc=lan" by
dn.subtree="gidNumber=0+uidNumber=0,cn=peercred,cn=external,cn=auth" manage by * none
olcAccess: to dn.subtree="dc=hive,dc=lan" by dn.subtree="gidNumber=0+uidNumber=0,cn=peercred,cn=external,cn=auth" manage by users read by * none
Save and close the file.
Update the database access control list, using the information in the newly created update-mdb-acl.dif file, with the command:
sudo ldapadd -Y EXTERNAL -H ldapi:/// -f update-mdb-acl.ldif
Now we’ll update the database, using the OU information, with the command:
sudo ldapadd -Y EXTERNAL -H ldapi:/// -f users-ou.ldif
We can now add a new user account. Create a new file with the command:
nano user.ldif
In that file, paste the following (modifying it for the user information to be added):
dn: uid=olivia,ou=people,dc=hive,dc=lan
objectClass: inetOrgPerson
objectClass: posixAccount
objectClass: shadowAccount
uid: olivia
cn: olivia
sn: Nightingale
loginShell: /bin/bash
uidNumber: 10000
gidNumber: 10000
homeDirectory: /home/olivia
shadowMax: 60
shadowMin: 1
shadowWarning: 7
shadowInactive: 7
shadowLastChange: 0 dn: cn=olivia,ou=groups,dc=hive,dc=lan
objectClass: posixGroup
cn: olivia
gidNumber: 10000
memberUid: olivia
Add the new user with the command:
sudo ldapadd -Y EXTERNAL -H ldapi:/// -f user.ldif
Set the password for the user with the command (substituting the new username and your domain):
sudo ldappasswd -H ldapi:/// -Y EXTERNAL -S "uid=olivia,ou=people,dc=hive,dc=lan"
You will be prompted to enter and verify the new password.
Finally, we have to create a read only username that will be used to query the LDAP server. Generate a password hash with the command:
slappasswd
You’ll be prompted to type and verify a password. When the command completes, you’ll be presented with a hashed password. Copy the hashed password.
Create a new user file with the command:
nano readonly-user.ldif
Paste the following into that file (substituting your domain):
dn: cn=readonly,ou=people,dc=hive,dc=lan
objectClass: organizationalRole
objectClass: simpleSecurityObject
cn: readonly
userPassword: {SSHA}HASH
description: Bind DN user for LDAP Operations
Where HASH is the hashed password you copied.
Add the new user to the database with the command:
sudo ldapadd -Y EXTERNAL -H ldapi:/// -f readonly-user.ldif
How to install phpLDAPadmin
Now we can install the web-based administration tool with the command:
sudo apt-get install phpldapadmin -y
Open the phpLDAPadmin configuration file with the command:
sudo nano /etc/phpldapadmin/config.php
Edit the following lines (making sure to change the domain to match yours and the IP address to match your hosting server):
$servers->setValue('server','name','My LDAP Server');
$servers->setValue('server','host','192.168.1.30');
$servers->;setValue('server','base',array('dc=hive,dc=lan'));
$servers->setValue('login','auth_type','session');
$servers->setValue('login','bind_id','cn=admin,dc=hive,dc=lan');
$servers->setValue('auto_number','min',array('uidNumber'=>10000,'gidNumber'=>10000));
Disable the Apache default site with the command:
sudo a2dissite 000-default.conf
Restart Apache with the command:
sudo systemctl restart apache2
How to access phpLDAPadmin
With everything taken care of, open a web browser and point it to http://SERVER/phpldapadmin (where SERVER is the IP address of your hosting server). Your default username (in the form cn=admin,dc=hive,dc=lan) will auto-populate.
Type the admin password you created and click Authenticate. You should find yourself at the phpLDAPadmin main page, ready to work (Figure D).
Figure D
” data-credit rel=”noopener noreferrer nofollow”>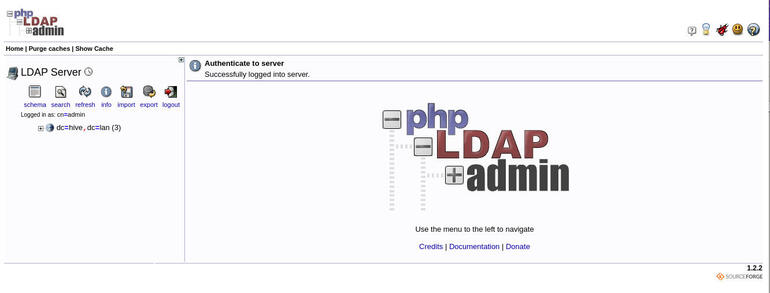
phpLDAPadmin is ready to serve your needs.
Congratulations, you now have OpenLDAP and phpLDAPadmin up and running, ready to be used for your organization…all from the convenience of your own data center.
Subscribe to TechRepublic’s How To Make Tech Work on YouTube for all the latest tech advice for business pros from Jack Wallen.

Data Center Trends Newsletter
DevOps, virtualization, the hybrid cloud, storage, and operational efficiency are just some of the data center topics we’ll highlight. Delivered Mondays and Wednesdays
Also see
Source of Article