If you’re worried about a server or desktop losing the data stored within, there’s a new version of Rescuezilla ready to jump in and help. Jack Wallen explains.

Image: TierneyMJ/Shutterstock
Rescuezilla has been around for a while now and it’s proved itself to be an absolute must for any admin needing to recover data from a problematic drive or computer. In late December 2021, the developers released the latest version of the “Swiss Army Knife of System Recovery.”
This new release is based on Ubuntu 21.10, and includes kernel 5.13, and adds a few important features that should excite many an admin looking for the best all-around free data recovery tool.
SEE: Power checklist: Troubleshooting hard drive failures (TechRepublic Premium)
The new features added to this Linux-based data-centric distribution include additions like:
- Basic image verification.
- A new “Rescue” option that ignores file system inconsistencies and bad sectors.
- Ability to restore and explore images created by the Apart GTK UI for partclone.
- Improved scanning features to fix incomplete restore image lists.
- Improves restoring of images created by FSArchiver or the qt-fsarchiver GUI.
- Error messages are now displayed when it discovers duplicate image names and/or when you attempt to mount a swap partition.
There are two ways you can use Rescuezilla. The first is the traditional method of downloading the ISO, burning the ISO to a USB drive, booting the USB drive, and using the included tools to back up or restore your data. The tool also allows you to easily clone one drive to another, which makes for an outstanding method of rescuing your data from a failing server. The Rescuezilla GUI is straightforward enough that just about anyone can successfully back up data or clone a drive.
That traditional method should be a part of every admin’s skillset (and fortunately, it really is just as easy as booting a USB drive and following the steps).
There’s also another route you can take. It’s only suitable for Ubuntu-based Linux machines with a desktop. Say, for instance, you have an Ubuntu server that you’ve installed a GUI onto, and it’s starting to show signs that some part of the hardware is failing. Let’s say you’re not so certain you trust that if you were to reboot the machine that it would actually come back up. We’ve all been there before.
What do you do? Panic? No. The developers of Rescuezilla have created the means to install the tool onto a running Ubuntu-based server, so you can use the tools without having to reboot the machine.
Let me show you how that’s done.
What you’ll need
The only things you’ll need are a running instance of an Ubuntu-based machine, a user with sudo privileges and a second drive (large enough to hold the data or the image you want to rescue). That’s it. Let’s make this happen.
How to install Rescuezilla
Open a terminal window on your server and download the .deb file for Rescuezilla version 2.3.1-1 (the latest release) with the command:
wget https://github.com/rescuezilla/rescuezilla/releases/download/2.3.1/rescuezilla_2.3.1-1_all.deb
Once that downloads, install the file with:
sudo dpkg -i rescuezilla_2.3.1-1_all.deb
The above command will error out, which isn’t a problem. Fix the issues with the command:
sudo apt-get install -f
The apt-get command will resolve all of the dependency issues. Next, we need to add the nbd module to be loaded at boot time (so Rescuezilla will run properly). Issue the command:
sudo nano /etc/modules
At the bottom of that file, add:
nbd
Save and close the file. Reboot your machine and then start the Rescuezilla application. From the main window (Figure A), you can choose from Backup, Restore, Clone, Verify Image, and the beta version of the new Image Explorer.
Figure A
” data-credit>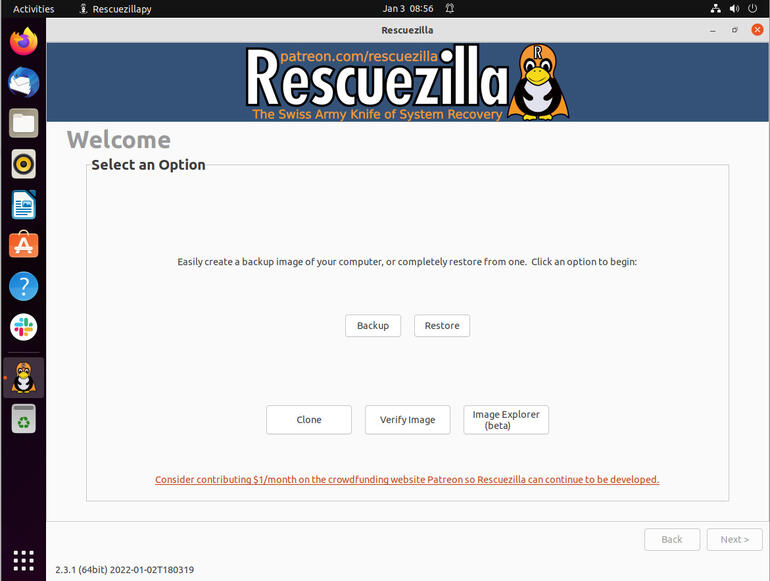
Rescuezilla has been installed on ubuntu 21.04 and is ready to work.
One bonus of installing Rescuezilla is that you could even use it to back up data on a server or desktop that isn’t failing. Granted, it doesn’t have the flexibility of a schedulable backup, but if you like doing things manually, this could be the way to go.
But most importantly, you now have the means to rescue that data (or entire image) from a failing drive, without having to reboot the machine and worry that it won’t boot.
Either way you go (booting from a USB or installing to your drive), Rescuezilla should be considered one of the first tools you turn to when hardware starts to go bad.
Subscribe to TechRepublic’s How To Make Tech Work on YouTube for all the latest tech advice for business pros from Jack Wallen.

Open Source Weekly Newsletter
You don’t want to miss our tips, tutorials, and commentary on the Linux OS and open source applications. Delivered Tuesdays
Also see
Source of Article