If you’re looking to maintain a stable set of Kubernetes replica pods running at any given time, the tool you need is ReplicaSets. Find out how to use this handy feature.
Image: Jack Wallen
When you deploy a pod within a Kubernetes cluster, you will often create replicas of the pod to scale an application or service. The best way to control these replicas is via a ReplicaSet, which makes sure specified replica pods are always running at the desired state. Without a ReplicaSet, you would have to create multiple manifests for a given number of pods needed for a single application or service.
For those that have used Kubernetes for a while, the ReplicaSet is considered the next-gen replacement for the replication controller.
I want to show you how to create a ReplicaSet on a running Kubernetes cluster. We’ll use the tried and true NGINX pod as an example (since you’re probably already familiar with the deployment of such a pod).
SEE: Hiring kit: Database administrator (TechRepublic Premium)
What you’ll need
In order to create a ReplicaSet, you’ll need a running Kubernetes cluster. If you’ve yet to deploy such a cluster, read my article: How to deploy a Kubernetes cluster on Ubuntu server. If you’ve deployed your cluster on a third-party service, such as AWS, this how-to should work without much change.
As you probably expected, I’ll be demonstrating with a Kubernetes cluster running on three instances of Ubuntu Server.
How to create the YAML file
As with just about everything related to Kubernetes, we define our ReplicaSet via a YAML file. Create the file with the command:
nano rs.yaml
Let’s break down the contents of the file. The first two lines define the API version to be used (v1) and what the YAML file will be deploying (ReplicaSet). These lines are:
apiVersion: apps/v1
kind: ReplicaSet
The next section defines the metadata for the pod, which declares what we’re trying to achieve with the pod. In our instance we’re creating an NGINX proxy pod to serve as a frontend. This section looks like:
metadata: name: nginx-proxy labels: app: nginx-proxy tier: frontend
In the next section, we define the specs for the ReplicaSet. We start off by deploying five replicas and then we use matchLabels to instruct Kubernetes what pods the deployment will apply to (in our case, nginx-proxy). We’ll also name the containers and define the image to be used for the pod (nginx). This section looks like:
spec: replicas: 5 selector: matchLabels: tier: frontend template: metadata: labels: tier: frontend spec: containers: - name: nginx image: nginx
When you put this entire YAML together, it looks like:
apiVersion: apps/v1
kind: ReplicaSet
metadata: name: nginx-proxy labels: app: nginx-proxy tier: frontend spec: replicas: 5 selector: matchLabels: tier: frontend template: metadata: labels: tier: frontend spec: containers: - name: nginx image: nginx
Save and close the file.
How to deploy the ReplicaSet
Now that you have your YAML file together, we’ll deploy it so it will create five replicas of the NGINX pod. To do that, issue the command:
kubectl apply -f rs.yaml
You could also use the command:
kubectl create -f rs.yaml
The command will report back that the ReplicaSet was created. You can verify this with the command:
kubectl get replicaset
You should see the new ReplicaSet running (Figure A).
Figure A
” data-credit rel=”noopener noreferrer nofollow”>
Our ReplicaSet has been successfully deployed.
How to alter the running ReplicaSet
Say you need to scale the ReplicaSet up from five to 10. That’s actually really easy. Open your YAML file and change the line:
replicas: 5
To:
replicas: 10
Save and close the file. Rerun the command:
kubectl apply -f rs.yaml
You should see replicaset.apps/nginx-proxy configured reported back. To verify the change, issue the command:
kubectl get replicaset
You should now see that ReplicaSet is in the new desired state (Figure B).
Figure B
” data-credit rel=”noopener noreferrer nofollow”>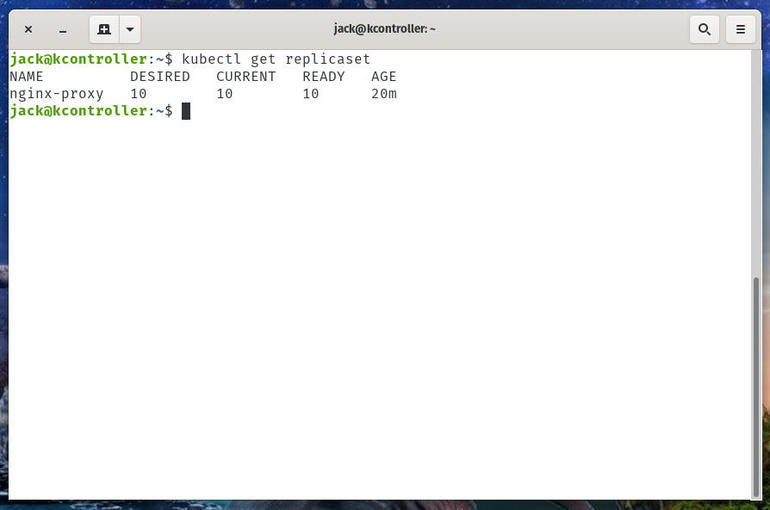
We’ve scaled our replicas from five to 10.
You can also check the status of the individual pods with the command:
kubectl get pods
You should see all 10 pods running (Figure C).
Figure C
” data-credit rel=”noopener noreferrer nofollow”>
Our 10 NGINX proxy pods are running.
And that’s how easy it is to deploy a Kubernetes ReplicaSet. To learn more about this important feature, make sure to give the official Kubernetes documentation a read.

Data Center Trends Newsletter
DevOps, virtualization, the hybrid cloud, storage, and operational efficiency are just some of the data center topics we’ll highlight. Delivered Mondays and Wednesdays
Also see
Source of Article