
Microsoft recently made Outlook for Mac free, a move sure to encourage adoption. If you’re using Outlook for Mac, or thinking of making the change, here’s how to customize the app’s email views.

Microsoft Outlook has long been the de facto email client app standard for business, and for good reason. The program is reliable, offers easy account configuration and typically eliminates many formatting and other potential issues that Microsoft-centric IT staff or others might occasionally be tempted to blame on the Mac’s native Mail app.
In early March 2023, Microsoft made the Outlook app for Mac free. Previously a Microsoft 365 subscription or standalone license was required.
Jump to:
How to get Outlook for Mac
The Microsoft Outlook app for Mac is easily obtained. Just go to the Mac App Store and download the program.
Once installed, associate your email account with the app. To add an email account to Outlook for Mac, open the program, click Tools from the menu bar, then select Accounts. Within the Accounts window that appears, click the + icon (Figure A).
Figure A
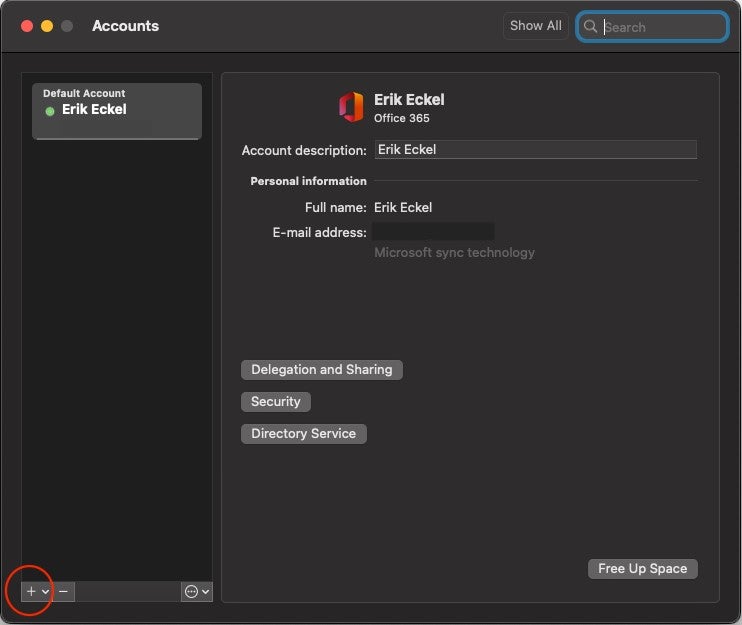
Add email accounts to Outlook for Mac using the Accounts window.
Ever versatile, Outlook for Mac permits associating a variety of email accounts, including those powered by Microsoft Exchange, IMAP, Google and Apple iCloud. An Add Accounts wizard (Figure B) is included to assist the process.
Figure B
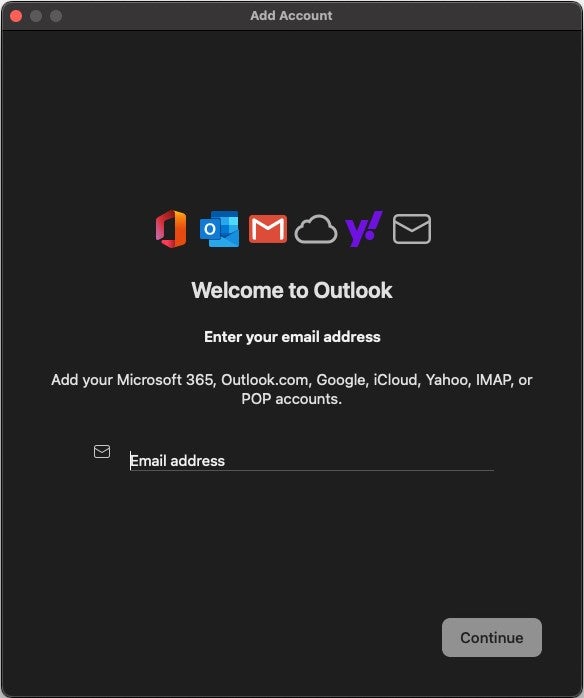
Outlook for Mac includes an Add Account wizard to assist connecting email accounts.
After entering the email address and specifying any necessary account settings, Outlook for Mac adds the email account. Corresponding messages should then appear within the app.
How to customize Outlook for Mac
Microsoft’s Mac email client permits easy personalization to view combinations. Figure C shows one option in which both the folders and My Day sidebars are hidden to enable the reader to focus on messages.
Figure C

Multiple view configurations and tweaks are available using Outlook for Mac. Here, sidebars are hidden so you can focus on messages.
One of the best methods for navigating Outlook for Mac’s view configurations is to pause when mousing over various icons. After a moment, as is common, the app will display corresponding pop-up explanations. Using that method, you can do the following:
- Enable and disable the folders sidebar within the left navigation pane.
- Hide and display the Notifications pane on the right-hand side.
- View more items hidden within the displayed list of icons, which allow you to delete, reply and forward messages.
- Share items using Teams.
- Send information to OneNote.
- Report suspicious phishing messages.
You can access additional Outlook for Mac display configurations by clicking View on the menu bar. Options include hiding or disabling message previews and converting messages to Conversations view, in which Outlook threads messages.
You can arrange the Reading Pane — the window where message content appears — on the screen’s right-hand side. Some professionals prefer placing that pane at the bottom of the app. To change the location, click View then Reading Pane and specify Right, Below or Hidden (to remove the Reading Pane entirely).
Outlook for Mac also offers a Focused Inbox. This feature, when enabled, separates email between two tabs: one for Focused and another titled, perhaps inspiringly, Other.
Messages deemed important are placed within the Focused tab, while information suspected to be less relevant is moved to the Other tab. To enable Focused Inbox, click View and select Turn On Focused Inbox. To disable the feature, click Turn On Focused Inbox, which will remove the checkmark indicating the feature is actively processing messages to the Inbox and returning the configuration to the traditional view.
Message preview is another element easily added or removed from the app’s mail view. The image shown previously in Figure C featured previews, which appear as a one-line message glimpse into each corresponding email, immediately below the respective subject line.
While the default Outlook for Mac toolbar works well, adjustments are easy to make and take but a moment to provide time-saving convenience throughout each business day. To adjust the toolbar, click View, then select Customize Toolbar. The toolbar customization window will appear (Figure D). Simply drag and drop the respective icon to add, remove and change its locations within the email client.
Figure D
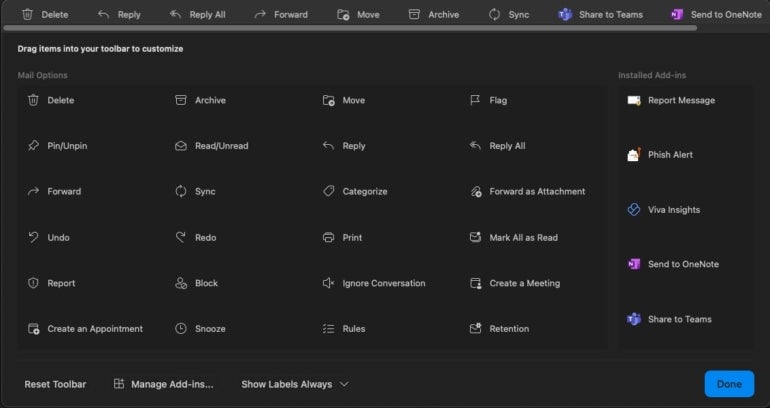
When the Customize Toolbar is selected in Outlook for Mac, the icons appearing within the customization window will gently undulate to indicate the app is in customization mode. Delete, Archive, Pin/Unpin, Undo and Block are among the many options available for customization.
A few quick tweaks pay continual dividends
Outlook for Mac is a robust, reliable and capable email client. Now that it’s free, even more Mac users can employ the app for most any email account or service. Taking time to make a few tweaks or adjustments first helps ensure the tool matches personal preferences and assists productivity throughout each workday, so the corresponding quick time investment is well worth the effort. Worst case, should you determine a view adjustment you’ve entered doesn’t work as intended, you can always switch back.
Source of Article