Jack Wallen walks you through the process of deploying the Portainer web-based container management platform with Podman.

Portainer has been my favorite container management platform for some time. It offers every feature I need to make working with containers a breeze.
Portainer was originally built for Docker, and with the rootless nature of Podman, Portainer had some serious issues and wouldn’t deploy. However, Podman can be run as either root or non-root, so it is actually possible to deploy the Portainer GUI for the Podman runtime.
SEE: Hiring kit: Back-end Developer (TechRepublic Premium)
Sigh. Of. Relief: That’s how much I prefer Portainer over every other container management system. For those that have yet to experience Portainer, some of what it can do for you via its well-designed GUI is:
- Manage containers, images, volumes and networks
- Build full-stack applications
- Connect to remote registries
- Create multiple development environments
- Manage users
- Work with Templates
- Manage secrets
So how do you deploy Portainer with Podman? Let me show you.
What you’ll need to deploy Portainer with Podman
To deploy Portainer with Podman, you’ll need an operating system that supports Podman such as Rocky Linux, AlmaLinux, RHEL or CentOS, as well as a user with sudo privileges. That’s it.
How to deploy Portainer with Podman
Are you ready for this? I thought so. The process is incredibly easy. Log in to your Podman-supporting OS and open a terminal window. Make sure to first enable the Podman socket with the command:
sudo systemctl enable --now podman.socket
With the Podman socket running, pull the latest release of Portainer CE with:
podman pull portainer/portainer-ce
After the image is pulled, you can then deploy Portainer. One thing to keep in mind is that you must deploy the container with sudo privileges. If you attempt to deploy the container without sudo, you’ll get the error:
Error: statfs /run/podman/podman.sock: permission denied
Although you can configure Podman to run without sudo, we’re not going to bother with that, as it opens up more security issues that you might want — especially when dealing with a production machine. I will walk through the process of enabling sudo-less container deployment with Podman in a later piece.
In the meantime, let’s deploy. The command for this is:
sudo podman run -d -p 9443:9443 --privileged -v /run/podman/podman.sock:/var/run/docker.sock:Z portainer/portainer-ce
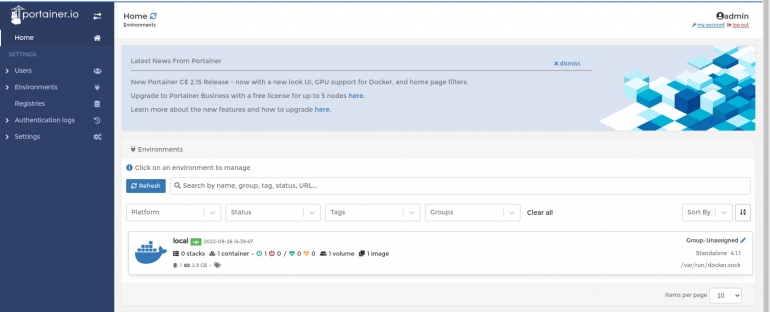
After the command completes, give the container a minute or so to deploy and then point your browser to https://SERVER:9443, where SERVER is the IP address of the hosting server. You should be greeted by the admin user creation page. Give the admin user a strong and unique password, and then click Get Started. You’ll then find yourself on the Portainer CE main page (Figure A), where you can begin deploying all the containers you need.
Figure A
I’ve covered Portainer quite a bit here on TechRepublic. Now that you have this outstanding GUI up and running, take a look at the Portainer articles I’ve previously written to get up to speed on how to use the tool.
Subscribe to TechRepublic’s How To Make Tech Work on YouTube for all the latest tech advice for business pros from Jack Wallen.
Source of Article