Jack Wallen helps take the frustration out of using AppImages on the Linux desktop with the help of an easy-to-use application.
I don’t care where the application comes from, if it’s helpful I’ll use it. But with the Linux desktop, there are numerous ways to install an application. You can install from source, from your package manager, with the help of Snap or Flatpak packages, and even AppImages.
All of these are great options and will end up with you having the applications you need. However, not all installation methods are created equal. For example, if you install from source, those applications won’t be easily upgraded via the built-in package manager. AppImages are a great way to run applications on Linux, but they don’t integrate with your desktop. Run an AppImage app, and try to pin it to your dock, panel or shelf. You can’t. At least not out of the box.
SEE: 40+ open source and Linux terms you need to know (TechRepublic Premium)
Fortunately, there’s a small application you can install that goes a long way to make this process incredibly easy. That application is called AppImageLauncher, and when used, it adds an entry for any AppImage you run to your desktop menu. All this app does is create shortcuts for your AppImages and automatically sets the executable permission.
I’m going to show you how to install and use this tool to help make your Linux desktop life a bit easier.
What you’ll need to install and use AppImageLauncher
To use AppImageLauncher you’ll need a running instance of Linux, a user with sudo privileges, and an AppImage or two to run. AppImageLauncher can be installed on any system that supports either .deb or .rpm packages. That’s all you need, so let’s get to it.
How to install AppImageLauncher
The installation of AppImageLauncher is quite simple. All you need to do is download either the .deb or .rpm file for your system architecture from the project’s GitHub page and save it to your ~/Downloads directory.
Once the file has been saved, open a terminal window and issue one of the following two commands to install:
- For the .deb package:
sudo dpk -i appimagelauncher*.deb - For the .rpm package:
sudo rpm -i appimagelauncher*.rpm
After the package has been installed, you’ll find a launcher for it in your desktop menu.
How to use AppImageLauncher
Start AppImageLauncher and you’ll be greeted by the Settings window (Figure A).
Figure A
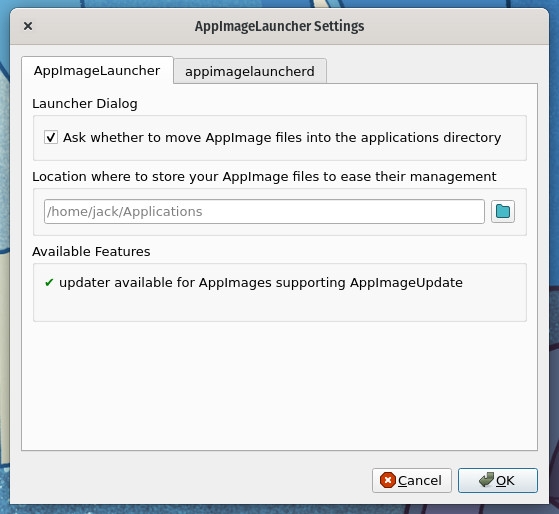
The only configuration you’ll need to take care of is the location of your AppImages folder. By default, that directory lives in /home/USER (where USER is your username). However, AppImageLauncher does not create that directory. Because of that, you either need to create the directory or set the home of your AppImages to another location. If you opt to create the directory, that can be done with the command:
mkdir ~/Applications
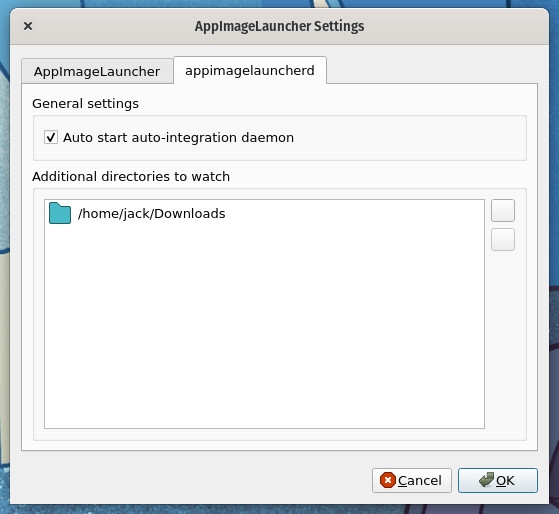
You can also add additional directories by clicking the appimagelauncherd tab, clicking the top button at the right side of the Additional Directories To Watch window, and then selecting the directory you want to add (Figure B).
Figure B
When you have the app configured, click OK.
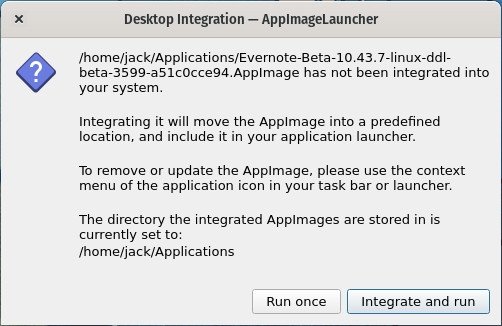
Either download any AppImages you want into the newly created ~/Applications folder or move any you’ve already downloaded into it. With that taken care of, open your file manager, navigate to the ~/Applications directory, and double-click on one of the AppImages. AppImageLauncher will open a new window (Figure C), asking if you’d like to either Run Once or Integrate And Run. Click Integrate And Run to add a launcher to your desktop menu, and run the application.
Figure C
Every time you launch a new AppImage from within the watched directory, AppImageLauncher will ask if you want to run or run and integrate. Make sure you integrate those new AppImages, so you have easier access to them.
And that’s all there is to using AppImageLauncher to integrate those AppImage applications into your Linux desktop.
Subscribe to TechRepublic’s How To Make Tech Work on YouTube for all the latest tech advice for business pros from Jack Wallen.
Source of Article