Lots of documents are full of acronyms; some are defined, some aren’t. If you need to review acronyms in a Microsoft Word document for any reason, here are three approaches.

Illustration: Lisa Hornung, Getty Images/iStockPhoto
Enterprise users have it made when searching for acronyms and their definitions because Microsoft Word’s newish Editor has that functionality built in. The rest of us have to work a bit harder to find acronyms, and fortunately there’s more than one way.
SEE: 83 Excel tips every user should master (TechRepublic)
An acronym is a series of initials used to represent a longer phrase. For instance, URL isn’t a word on its own, it’s an acronym for Uniform or Universal Resource Locator. In this article, I’ll show you three ways to highlight them in a document.
I’m using Microsoft 365 on a Windows 10 64-bit system, but you can use earlier versions. This article isn’t supported by Word Online. You can enter your own content, but if you download the demonstration .docm, .doc and .cls files, you’ll have quick access to the code reviewed in this article.
1. How to use the Acronym pane in Word
The enterprise version of Microsoft 365 has a feature that lists acronyms for you in the desktop and online versions. To see a list of defined acronyms, click the References tab. The Acronyms pane will show a list of your defined acronyms. By defined, I mean the phrase the acronym represents. Again, for URL, the pane would also display Uniform or Universal Resource Locator. If you select an acronym in the text, this feature will add the definition for you! If you don’t find a definition, you can wait a few days to see if the feature updates accordingly, or you can define it yourself. This feature is available only with an enterprise license.
2. How to use Find in Word
If you don’t have an enterprise license, you can use the Find feature to highlight all the acronyms in a document. It’s important to note that this method isn’t as smart as you might think because it will highlight any instance of two or more uppercase letters. That means the results might highlight something other than a true acronym. Now, let’s look at a search string that you can use:
- Click Ctrl + F or click the Editing dropdown on the Home tab to open the Navigation pane. From the dropdown (to the right), choose Advanced Find.
- Click More and then check the Use Wildcards option.
- Check the No Formatting option at the bottom if not dimmed. The Find feature remembers the last Find task and if it includes formatting, you might not get the expected results. It’s a good idea to always check this option when starting a new Find task.
- In the Find What control, enter <[A-Z]{2,}> (Figure A).
- Click Reading Highlight and then click Highlight All.
- Click Close to see the highlights shown in Figure B.
Figure A
” data-credit>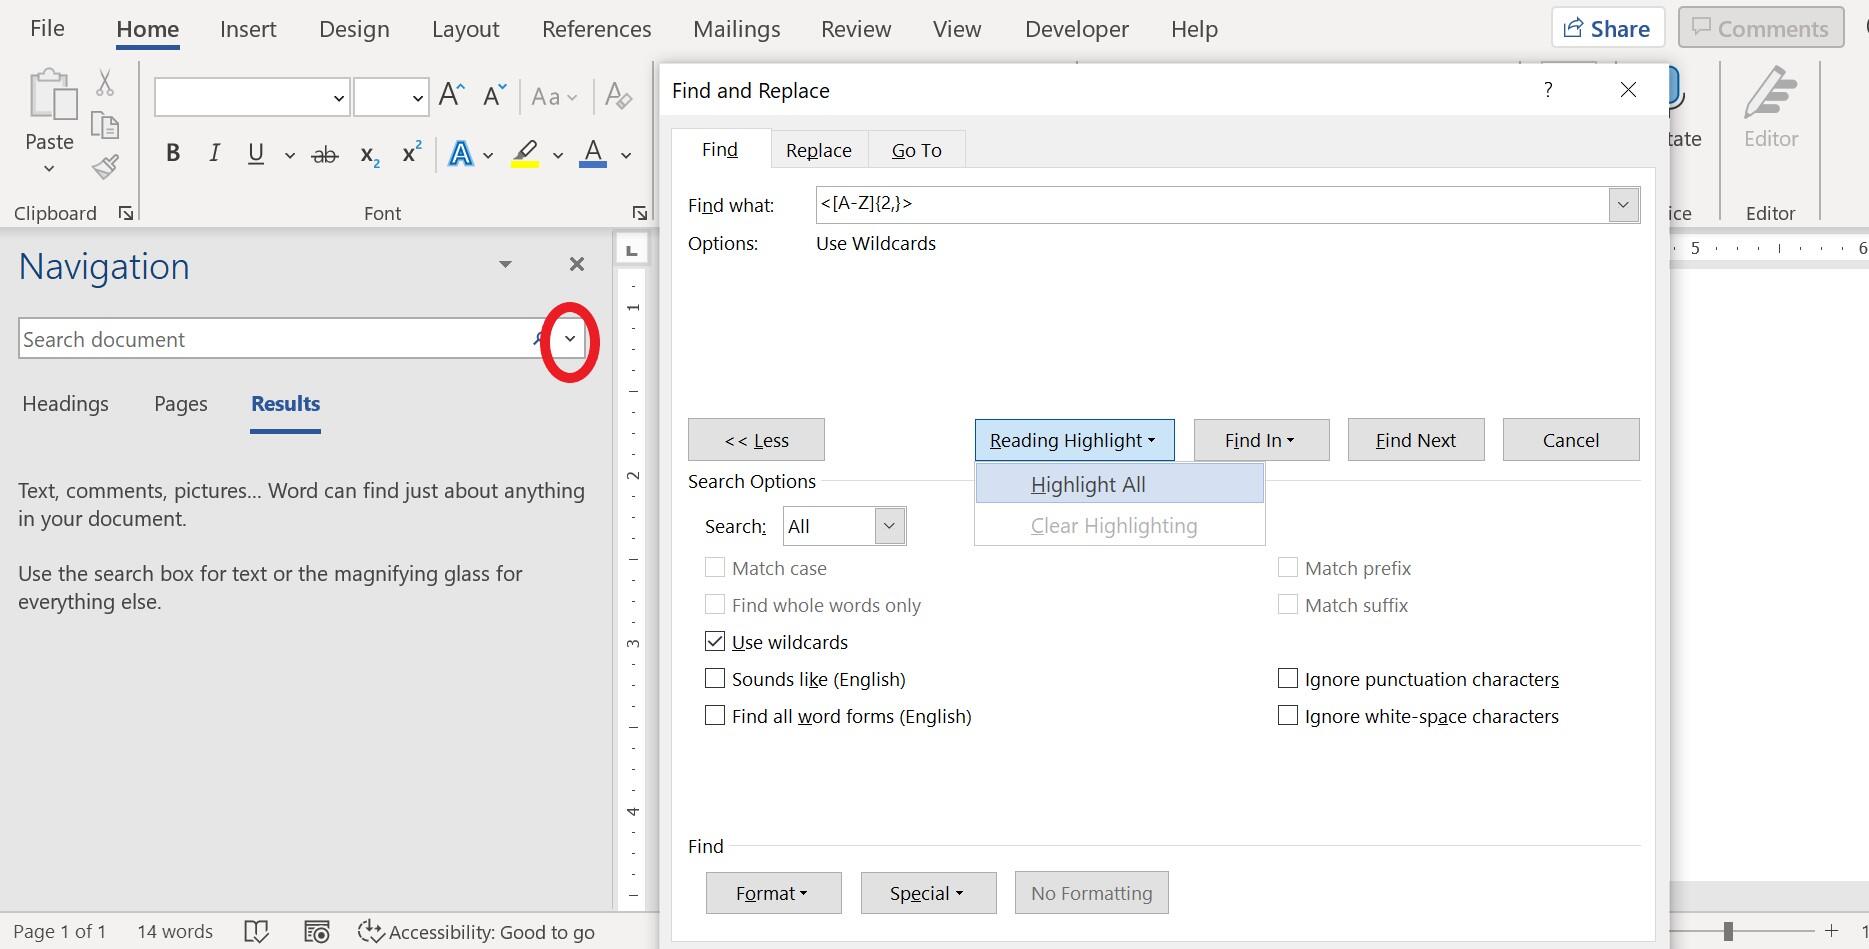
Complete the Find options.
Figure B
” data-credit>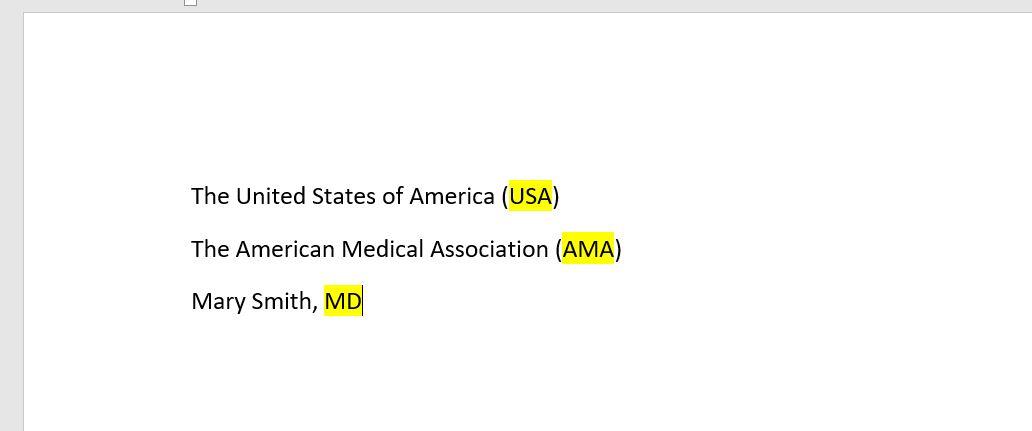
Highlight all instances of two or more uppercase characters.
This method has two flaws:
- It highlights MD. While you might consider it an acronym of sorts, you probably won’t want to highlight it in this type of search. If you correct it to M.D. (with periods), the Find task will ignore it.
- All the highlights disappear as soon as you click something.
This method can be more frustrating than helpful because the highlights aren’t permanent. Now, let’s look at a VBA procedure that has a more permanent outcome.
3. How to use a VBA procedure in Word
A quick highlight might be all you need, but most of the time, you’ll want something more permanent. The procedure in Listing A does the same thing that the Find string in the last section does. The only difference is that it’s permanent until you remove it. You can use this same code to remove the highlights by changing .Replacement.Highlight to False.
Listing A
Sub HighlightAcronyms()
‘This procedure highlights all instances of two or more
‘uppercase letters.
Selection.Find.ClearFormatting
With Selection.Find
.Text = “<[A-Z]{2,}”
.Forward = True
.Wrap = wdFindContinue
.MatchWildcards = True
.Replacement.Text = “”
.Replacement.Highlight = True ‘False to remove highlights.
.Execute Replace:=wdReplaceAll
End With
End Sub
This code does exactly the same thing as you did manually in the last section. It uses a search string to find all instances of two or more consecutive uppercase letters. As earlier, sometimes the procedure will highlight something that’s not a true acronym.
SEE: Windows 10: Lists of vocal commands for speech recognition and dictation (free PDF) (TechRepublic)
If you’re using a ribbon version, be sure to save the workbook as a macro-enabled file or the procedure won’t run. If you’re using a menu version, you can skip this step. To add the procedure, press Alt + F11 to open the Visual Basic Editor. In the Project Explorer to the left, select ThisWorkbook so you can run the procedure in any sheet. You can enter the code manually or import the downloadable .cls file. In addition, the macro is in the downloadable .docm and .doc files. If you enter the code manually, don’t paste from this web page. Instead, copy the code into a text editor and then paste that code into the ThisWorkbook module. Doing so will remove any phantom web characters that might otherwise cause errors.
After entering the procedure, you can use it as follows:
- Click the Developers tab.
- Click Macros in the Code group.
- In the resulting dialog, choose HighlightAcronyms() as shown in Figure C and click Run.
Figure C
” data-credit>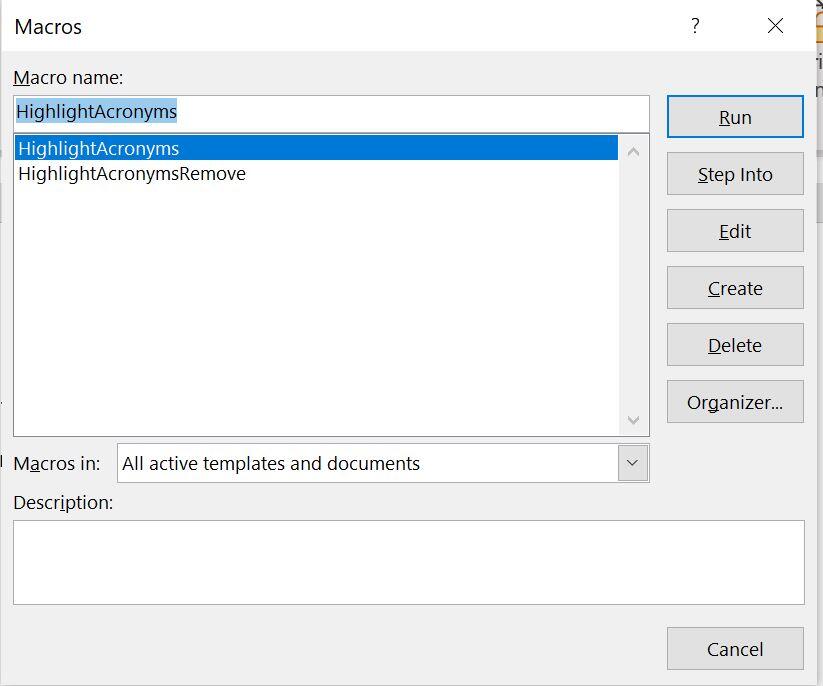
Run the procedure.
As you can see in Figure D, the acronyms are permanently highlighted. To remove them, run Sub HighlightAcronymsRemove(), which is in the demonstration files. I didn’t include it in the article text, because only one statement changes. Depending on how you’re calling the procedure, you could use one procedure and pass the True/False value as a Boolean.
Figure D
” data-credit>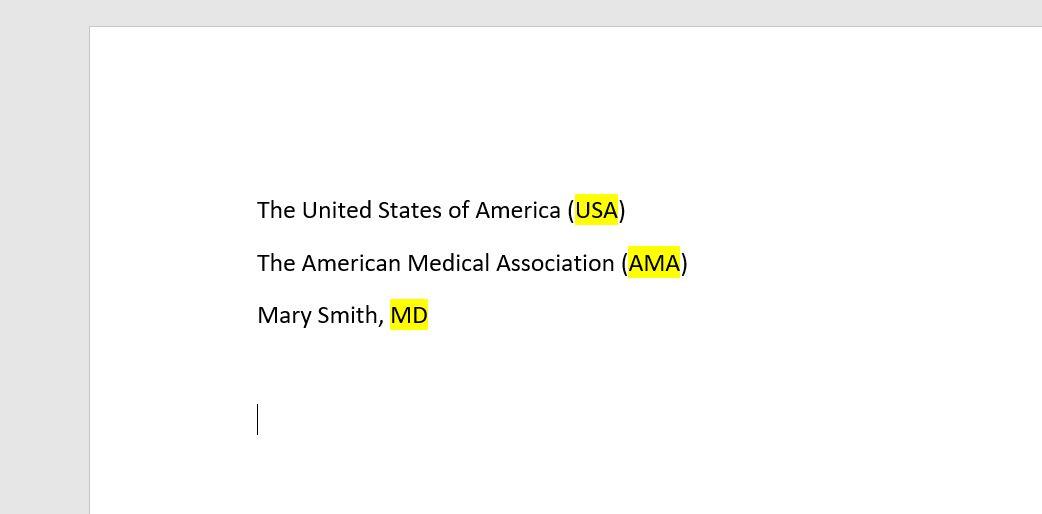
This highlight will stay until you remove it.
It’s unlikely that you’ll want to work through all those steps every time you want to run the procedure. Instead, add the macro to the Quick Access Toolbar. To do so, read How to add Office macros to the QAT toolbar for quick access.

Microsoft Weekly Newsletter
Be your company’s Microsoft insider by reading these Windows and Office tips, tricks, and cheat sheets. Delivered Mondays and Wednesdays
Also see
Source of Article