Learn how to troubleshoot Apache 2 when it’s not executing PHP files with this easy-to-follow, step-by-step tutorial.
How many times have you set up a web server with Apache 2 only to find out that when you attempt to view a page with a .php extension, the page either attempts to save onto the local drive or it displays the PHP code in the browser? This is bad on multiple levels. First off, your website isn’t functioning properly. Even worse, someone could get a first-hand glimpse of your code, which is not only a frustration but a possible security issue.
Considering this is an easy fix, there’s no reason to avoid working with PHP and Apache 2. But, how do you fix it? Let me show you.
Note: I demonstrate this process on Ubuntu Desktop 23.04, running the latest releases of Apache 2 and PHP 8.1. This process can work in most modern Linux distributions.
Jump to:
Installing Apache 2 and PHP 8.1
Package management makes the installation and configuration of Apache 2 and PHP 8.1 easy. Use the following commands in the terminal to install Apache 2, PHP 8.1, the PHP 8.1 command-line interpreter, and the module which configures Apache 2 and PHP 8.1 to work together:
sudo apt-get install apache2 php8.1 php8.1-cli \
libapache2-mod-php8.1 -y
Note: The above line is broken up because of the margin limitation on the page. The use of the backslash at the end of the line is intentional.
SEE: Take advantage of this checklist for managing and troubleshooting servers from TechRepublic Premium.
Starting and enabling Apache 2
Once the installation of Apache 2 and the PHP modules is complete, it will be necessary to start Apache 2 and enable Apache 2. If you start Apache 2 but do not enable it, then Apache 2 will not restart when you reboot your system:
sudo systemctl start apache2
sudo systemctl enable apache2
You can check the status of Apache 2 using the command:
sudo systemctl status apache2
This command will tell you if Apache 2 is running and if it is enabled.
Verifying the PHP 8.1. installation
With Apache 2 installed and PHP 8.1 configured, it will be necessary to verify that the installation is working. You can do this by creating a simple PHP script in the /var/www/html directory.
By default, the Apache 2 package will create an index.html file in the /var/www/html directory. You can remove this with the command:
sudo rm /var/www/html/index.html
The sudo command is necessary because this file is owned by root.
Now create a new file, /var/www/html/index.php, in its place:
sudo nano /var/www/html/index.php
And in this file, place the following code:
<?php
phpinfo();
?>
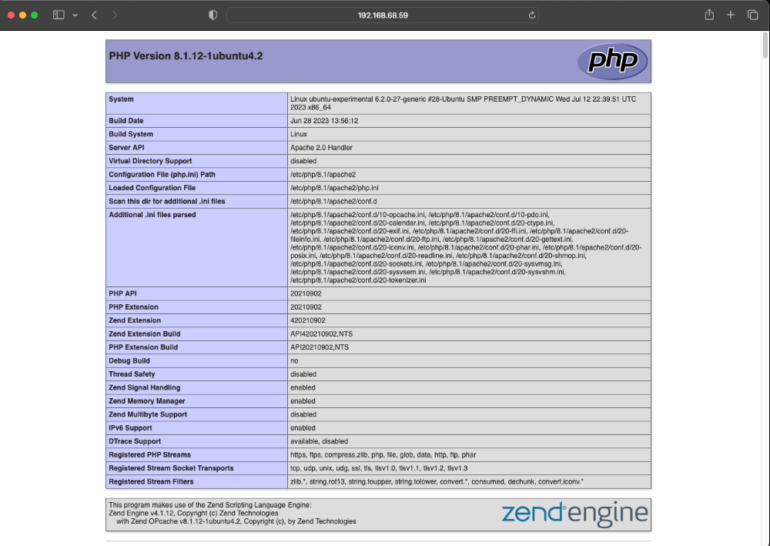
If you have a desktop environment and a web browser installed on your server, you can browse to the installation via the URL http://localhost. Otherwise, you can browse to the installation from another computer on your network using the IP address of the server on which you performed the installation.
If you see a screen that looks like the one below, then congratulations! You have successfully installed Apache 2 and PHP 8.1 (Figure A).
Figure A
Once you’ve verified that your Apache 2 and PHP 8.1 installations are working, you should definitely type out the phpinfo() command, especially if you have this running on a public-facing server:
<?php
//phpinfo();
?>
Next steps: Securing your Apache 2 and PHP setup
Normally, we could say “that’s it!” with regards to your Apache 2 and PHP setup, but that is most certainly not the case. For starters, the default configuration for Apache 2 is terribly insecure; your next course of action needs to be to properly secure it. You can get more information on exactly how to do this from the following articles:
Source of Article