If you’re looking for a cPanel/CentOS replacement, Jack Wallen thinks Virtualmin might do the job. He’ll show you what the tool has to offer and how to install it on Ubuntu Server.

Image: iStock/klmax
For many, Red Hat pulling support from the standard CentOS releases had some serious side effects. One of the biggest dominoes to fall was cPanel–for many web hosting companies, cPanel is the de facto standard control panel. It offers absolutely everything necessary to manage the hosting of your every client’s needs.
Once Red Hat pulled the plug on CentOS 8, cPanel announced they wouldn’t be supporting CentOS Stream. The good news is that the company is accelerating their efforts to support Ubuntu Server LTS, and should have that ready to ship by late 2021.
For those looking to either migrate away from CentOS or are looking for something that can be used on the Ubuntu platform for now (or for good), there’s always Virtualmin.
SEE: MSP best practices: Server deployment checklist (TechRepublic Premium)
Virtualmin is a web hosting and cloud computing control panel that is well supported on Ubuntu Server. Is this option a drop-in replacement for cPanel? If you ask someone who depends on cPanel that question, they’d most certainly answer with a definitive “no.” However, Virtualmin is a very good option for those looking to switch.
Virtualmin features:
-
Domain accounts management
-
Email management
-
User/reseller accounts and ACLs
-
Numerous security tools
-
Alerts, graphs, and logs
-
Backups
-
Cloud integration
-
Database management tools
-
Install scripts for CMS, CRM, forums, e-commerce, issue tracking, community, webmail, database management, mailing list management, and more
I want to show you how easy it is to get Virtualmin installed on Ubuntu Server 20.04. I’ll be installing the Community Edition, but the process for installing the Virtualmin Professional Edition is the same. I do recommend installing the Community Edition first, to see if this tool is the right fit for your needs.
What you’ll need
How to update and upgrade Ubuntu Server
The first thing to do is update and upgrade the server software. One thing to remember, if the kernel is upgraded, you’ll need to reboot the server. Because of this, make sure to run the update/upgrade at a time when a reboot is feasible.
To update/upgrade Ubuntu, log in to the server and issue the commands:
sudo apt-get update
sudo apt-get upgrade -y
When this completes, reboot the server (if necessary) and log back in.
How to change your hostname
Virtualmin wants a fully qualified domain name. That doesn’t mean you have to change your server’s hostname to an FQDN. For example (and we’ll stick with the example.com domain): Let’s say you want to use a shorter hostname, like virtualmin. You can do that, and then map the shorter name to the FQDN.
Set the hostname with the command:
sudo hostnamectl set-hostname virtualmin
The above example sets the hostname to virtualmin. Log out and log back in for the changes to take effect.
Next, map virtualmin to virtualmin.example.com in the hosts file. Open that file for editing with the command:
sudo nano /etc/hosts
At the bottom of that file, add a line like this:
192.168.1.211 virtualmin.example.com virtualmin
Make sure to exchange the information above to reflect that of your IP, FQDN, and hostname.
Save and close the file.
How to install Virtualmin
The developers of Virtualmin have created a very handy installation script. Download that script to the server with the command:
wget http://software.virtualmin.com/gpl/scripts/install.sh
Run the script with the command:
sudo bash install.sh
When prompted, type y to continue (Figure A).
Figure A
” data-credit rel=”noopener noreferrer nofollow”>
The installation script has launched and is ready to begin.
If you’ve set the hostname properly, the installation will begin, otherwise, you’ll have to manually type the FQDN of the server before the actual install proceeds. The installation will take between 10 and 30 minutes, depending on the speed of your hardware and network connection (Figure B).
Figure B
” data-credit rel=”noopener noreferrer nofollow”>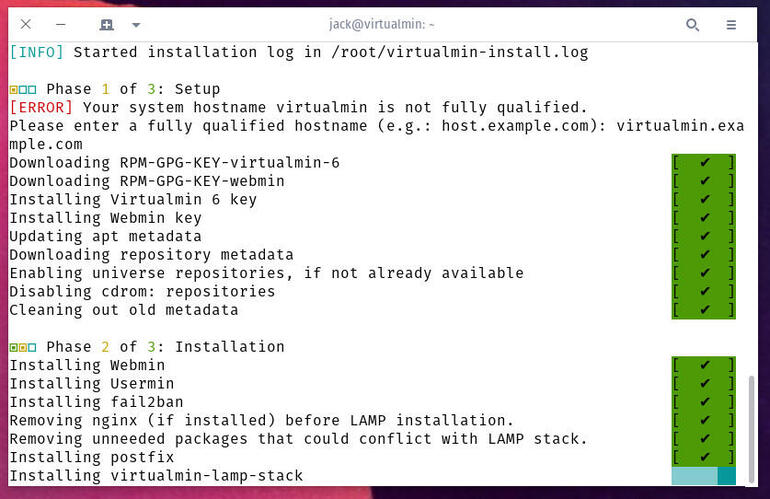
The Virtualmin installation in action.
When the installation completes, you can open a web browser and either point it to https://FQDN:10000 (where FQDN is the actual fully qualified domain name) or https://IP:10000 (where IP is the IP address of the server).
You’ll be prompted to log in with an account that has sudo privileges. Upon successful authentication, you’ll find yourself at the Virtualmin post-installation wizard, where you can tune the installation to better meet your needs (Figure C).
Figure C
” data-credit rel=”noopener noreferrer nofollow”>
The Virtualmin main window.
The post-install wizard allows you to tune things like:
-
How much RAM is used for the UI and mail domain lookup
-
Enabling ClamAV and Spamassassin
-
Which database servers to use
-
Set the database password
-
Password storage mode
-
Create virtual server
-
Enable SSL
Congratulations, you now have the Virtualmin web hosting and cloud computing control panel up and running on Ubuntu Server 20.04. It’s time you kick the tires and see if it can serve as a replacement for the cPanel/CentOS combo.
Subscribe to TechRepublic’s How To Make Tech Work on YouTube for all the latest tech advice for business pros from Jack Wallen.

Data Center Trends Newsletter
DevOps, virtualization, the hybrid cloud, storage, and operational efficiency are just some of the data center topics we’ll highlight. Delivered Mondays and Wednesdays
Also see
Source of Article