

A design pattern is a well-established and documented solution to a common software problem. You can think of them as best practices used by knowledgeable and experienced software developers. In the quarter century since Java was first introduced, software developers have faced numerous general problems during software development. Over time, the most advantageous solutions were obtained through trial and error, along with a great deal of experimentation involving many ideas and approaches. These solutions have now been codified into a set of recognized design patterns. Professional software developers are expected to know at least some popular solutions to typical coding problems. With that in mind, this series will present some of the main benefits of using design patterns, list the different types of design patterns, and finally, provide a brief summary of the patterns for each category.
Jump to:
Benefits of Java design patterns
Since every application is different, following an established design pattern does not guarantee the absolute perfect solution to your specific challenge. However, design patterns offer many advantages over trying to go it alone. Here are just a few:
- Design patterns can speed up the development process by providing tested, proven development paradigms.
- They promote reusability and may be implemented across multiple projects.
- They help to define the system architecture.
- They help provide transparency to the design of an application.
- Using design patterns leads to more robust and highly maintainable code.
- Makes code easier to understand and debug.
SEE: The Top Java Courses from TR Academy
Types of design patterns
The official reference book on design patterns is “Design Patterns – Elements of Reusable Object-Oriented Software”. It outlines 23 design patterns, which are broken down into three categories: Creational, Structural, and Behavioral patterns. We will also discuss some miscellaneous design patterns in this series. Here is more information on each category:
- Creational Patterns: These design patterns provide a way to create objects while hiding the creation logic, rather than instantiating objects directly using the new operator. This gives programmers more flexibility in deciding which objects need to be created for a given use case.
- Structural Patterns: These design patterns concern class and object composition. The concept of inheritance is used to build interfaces and define ways to compose objects to obtain new functionalities.
- Behavioral Patterns: These design patterns address communication between objects.
- Miscellaneous Patterns: These design patterns are identified by the Sun Java Center and are mostly related to the presentation tier.
The rest of this programming tutorial will provide an overview of the Creational patterns; other patterns will be added here at a later date.
Creational Patterns
Creational design patterns provide solutions to instantiate an Object in the best possible way for a given situation. The “Design Patterns” book describes five creational design patterns:
- Factory Pattern.
- Abstract Factory Pattern.
- Singleton Pattern.
- Prototype Pattern.
- Builder Pattern.
Now, let’s explore each of these in more detail.
Factory Pattern
The Factory Design pattern is used when we have a superclass with multiple subclasses and, based on input, we need to return one of the subclasses. This pattern takes out the responsibility of the instantiation of a Class from the client program to the factory class. Developers can apply a Singleton Pattern on the factory class or make the factory method static.
For example, we could create some concrete classes that implement the Shape interface. Classes would then use the ShapeFactory class to get a Shape object, passing in information about the type of object it needs (i.e. circle, rectangle, square, etc.). The factory class uses an if-else or switch statement to decide which class to return:
public class ShapeFactory { // get object of type shape // based on ShapeType enum public Shape getShape(ShapeType shapeType){ if(shapeType == null){ return null; } if(shapeType == ShapeType.CIRCLE){ return new Circle(); } else if(shapeType == ShapeType.RECTANGLE){ return new Rectangle(); } else if(shapeType == ShapeType.SQUARE){ return new Square(); } return null; }
}
Abstract Factory Pattern
The Abstract Factory Pattern takes the Factory Pattern up a notch by providing a factory of factories. In the Factory Design Pattern, you will typically have a single factory class that returns the different subclasses based on the input provided.
In the Abstract Factory Pattern, however, the if-else block of the above example would be replaced by multiple factory classes (one for each subclass). An abstract factory class then returns the subclass based on the input factory class.
Singleton Pattern
The Singleton Pattern restricts the instantiation of a Class and ensures that only one instance of the class exists in the Java Virtual Machine (JVM). The implementation of the Singleton Pattern has always been a controversial topic among developers. The sticking point is that singletons remain in memory for the life of an application, making them a potential drain on system resources. On the other hand, having one object in memory is preferable to having many instances existing simultaneously.
Prototype Pattern
The Prototype Pattern is used when the Object creation is costly and requires a lot of time and resources, and you have a similar Object that is already instantiated. Using the Prototype Pattern, programmers would copy the original Object to a new Object and then modify it according to their needs. Copying of the Object’s properties is achieved using Java cloning. The Prototype Design Pattern mandates that the Object which you are copying should provide the copying feature. It should not be done by any other class. However, whether to use the shallow or deep copy of the object properties depends on the requirements and is a design decision.
Builder Pattern
The Builder Pattern was introduced to solve some of the problems with Factory and Abstract Factory Design Patterns when the object contains a lot of attributes. This pattern solves the issue by introducing a large number of optional parameters. The object may also be in an inconsistent state and it may be built step-by-step. Lastly, the builder class provides a method that will actually return the final Object.
Structural Design Patterns
There are seven structural design patterns in Java, including:
- Adapter Pattern
- Bridge Pattern
- Composite Pattern
- Decorator Pattern
- Façade Pattern
- Flyweight Pattern
- Proxy Pattern
The next section will explore the Adapter and Bridge patterns in more detail.
Adapter Pattern
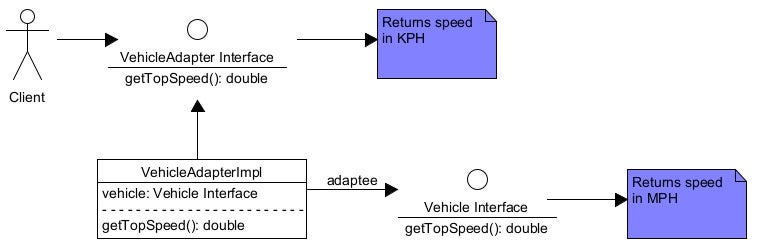
Also known as the Wrapper Pattern, the Adapter Pattern allows objects with incompatible interfaces to collaborate. It is named after the object that joins these unrelated interfaces, which is called an adapter. The adapter object takes calls for one object and transforms them to a format and interface recognizable by the second object.
The adapter pattern consists of four parts:
- Target Interface: This is the desired interface class which will be used by the clients.
- Adapter class: This class is a wrapper class which implements the desired target interface and modifies the specific request available from the Adaptee class.
- Adaptee class: This is the class which is used by the Adapter class to reuse the existing functionality and modify them for desired use.
- Client: This class will interact with the Adapter class.
As an example, let’s say that we have a Vehicle interface that defines a method that returns its top speed:
package com.techrepublic; public interface Vehicle { //other methods... double getTopSpeed(); //other methods...
}
Vehicle classes are expected to return the top speed in Miles Per Hour (MPH) as this one does:
package com.techrepublic; public class Infiniti implements Vehicle { @Override public double getTopSpeed() { // in MPH (Miles Per Hour) return 150; }
}
We could use the Adapter Pattern to return a vehicle’s top speed in Kilometers Per Hour (KPH).
To do that, we would first create an adapter interface that defines the method(s) that we are interested in:
package com.techrepublic; public interface VehicleAdapter { double getTopSpeed();
}
The Adaptee class would implement our VehicleAdapter interface and override the getTopSpeed() method to return Kilometers Per Hour rather than Miles Per Hour:
package com.techrepublic; public class VehicleAdapterImpl implements VehicleAdapter { private Vehicle canadianVehicle; public VehicleAdapterImpl(Vehicle canadianVehicle) { super(); this.canadianVehicle = canadianVehicle; } @Override public double getTopSpeed() { return convertMPHtoKMPH(canadianVehicle.getTopSpeed()); } private double convertMPHtoKMPH(double mph) { return mph * 1.60934; }
}
The real magic happens in our main application class where we can now pass a vehicle to our VehicleAdapterImpl constructor, which we can now use to convert the top speed from MPH to KPH:
package com.techrepublic; public class AdapterPatternDemo { public static void main(String[] args) { Infiniti canadianInfiniti = new Infiniti(); VehicleAdapter adapter = new VehicleAdapterImpl(canadianInfiniti); System.out.println("Top speed in KPH: " + adapter.getTopSpeed()); }
}
Here is the program output that shows the top speed in KPM:
Top speed in KPH: 241.401
We can see how the various objects fit together according to the Adapter pattern in the following UML diagram:
Bridge Pattern
The Bridge pattern splits a large class or a set of closely related classes into two separate hierarchies — abstraction and implementation — which can then be developed independently of each other. It is especially useful when dealing with cross-platform apps, supporting multiple types of database servers or working with several API providers, such as cloud platforms, social networks, etc.
Elements of the Bridge design pattern include:
- Abstraction: Core of the bridge design pattern, it’s an abstract class that contains a reference to the implementer.
- Refined Abstraction: Extends the abstraction takes the finer detail one level below. Hides the finer elements from implementers.
- Implementer: It defines the interface for implementation classes. Note that this interface does not need to correspond directly to the abstraction interface.
- Concrete Implementation: Implements the above implementer by providing the concrete implementation methods.
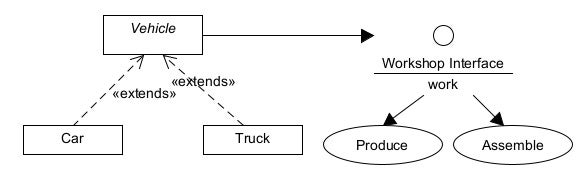
To illustrate the Bridge pattern, let’s imagine that we have a factory that produces and assembles different types of vehicles. The adage “prefer composition over inheritance” is good to remember when you have to subclass an object in ways that are distinct from one another.
Here is a UML diagram that depicts what the factory’s operations might look like without the Bridge pattern:

This works fine, until you need to make changes to a class. For example, refactoring the Car class may also require changing ProduceCar and AssembleCar. Moreover, if the changes are factory specific, then you may need to change other classes as well.
The Bridge pattern solves the above problem by decoupling the Vehicle and Factory interfaces as shown in this updated UML diagram:
The crux of the pattern is the abstract Vehicle class; it keeps track of the factories and defines the signature for the manufacture() method:
package com.techrepublic; abstract class Vehicle { protected Factory factory1; protected Factory factory2; protected Vehicle(Factory factory1, Factory factory2) { this.factory1 = factory1; this.factory2 = factory2; } abstract public void manufacture();
}
The next step is to refine the Vehicle abstraction into concrete classes. We will define a Car and Truck:
package com.techrepublic; public class Car extends Vehicle { public Car(Factory factory1, Factory factory2) { super(factory1, factory2); } @Override public void manufacture() { System.out.print("Car "); factory1.work(); factory2.work(); }
}
package com.techrepublic; public class Truck extends Vehicle { protected Truck(Factory factory1, Factory factory2) { super(factory1, factory2); } @Override public void manufacture() { System.out.print("Truck "); factory1.work(); factory2.work(); }
}
Now it is time to add the implementer for the Bridge pattern. In our case, it is an Interface for Factory methods:
package com.techrepublic; public interface Factory { abstract public void work();
}
Now each step of the production and assembly process can implement the Factory interface to execute whatever step(s) they are responsible for:
package com.techrepublic; public class Produce implements Factory { @Override public void work() { System.out.print("Produced"); }
}
package com.techrepublic; public class Assemble implements Factory { @Override public void work() { System.out.print("...and assembled.\n"); }
}
Here is the application class that ties everything together:
package com.techrepublic; public class BridgePatternDemo { public static void main(String[] args) { Vehicle car = new Car(new Produce(), new Assemble()); car.manufacture(); Vehicle truck = new Truck(new Produce(), new Assemble()); truck.manufacture(); }
}
Running the program produces the following output:
Car Produced...and assembled.
Truck Produced...and assembled.
It seems so simple, but a lot of pieces came together to make it happen!
Final Thoughts on Java Design Patterns
This tutorial provided an overview of the Java Structural Design Patterns and explored the Adapter and Bridge patterns in more detail. We’ll cover a few more Structural Design Patterns in the next installment.
SEE: Java Programming Career Bundle
Source of Article