If you’ve configured your Ubuntu servers to automatically install security updates, you might want to follow that up by configuring email alerts for those upgrades.

Image: Getty Images/iStockphoto
Recently I showed you How to enable automatic security updates for Ubuntu Server, which would automatically download and apply security updates for your open source servers. This is a great setup for anyone that has found themselves too busy to check for and apply updates.
But when something goes awry with an update, you might want to be alerted to that failure. The best route for that is via email.
I’m going to show you how to set up email notifications for update errors. It’s not terribly challenging, so you should be able to take care of this on all of your data center Ubuntu servers in no time.
What you’ll need
- A running instance of Ubuntu with automatic security updates configured
- A user with sudo privileges
Note: If you’ll be using the Gmail SMTP servers, you will need to set up an app password for Postfix (see: Bypass two-step authentication with app passwords).
SEE: Hiring kit: Network administrator (TechRepublic Premium)
How to install the necessary dependencies
In order for the server to be able to send out email alerts, you’ll need to install Postfix. To do this, open a terminal window and issue the command:
sudo apt-get install postfix -y
During the installation of Postfix, you’ll need to configure it as an internet site (Figure A).
Figure A
” data-credit rel=”noopener noreferrer nofollow”>
Configuring Postfix as an internet site.
Make sure to select Internet Site and tab down to OK. In the resulting window, enter the FQDN of your server and tab down to OK (Figure B).
Figure B
” data-credit rel=”noopener noreferrer nofollow”>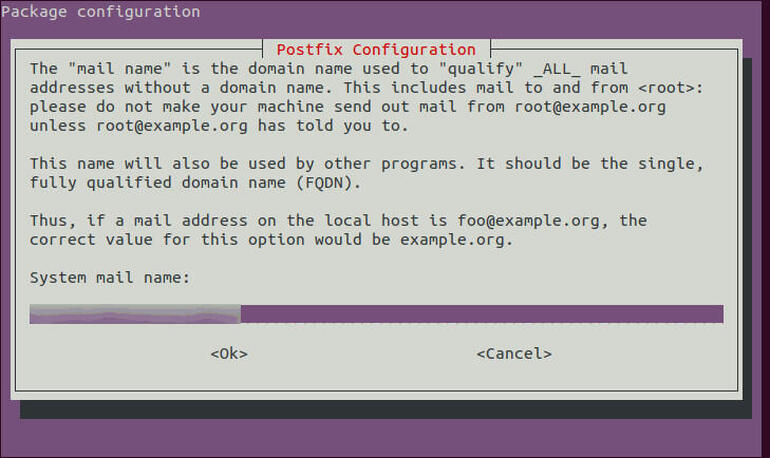
Configuring the FQDN of your server for Postfix.
How to configure Postfix
After the Postfix installation completes, you’ll need to configure the mail server. How you do this will depend on what you’re using for an SMTP server. For instance, if you have an in-house mail server, you’ll use the information for that server (including authentication credentials). If you’re using Gmail SMTP servers, you’ll first need to set up an app password in your Google account.
Once you know the specifics of your SMTP server, open the configuration file with the command:
sudo nano /etc/postfix/main.cf
Look for the line:
relayhost =
You’ll need to change that line to reflect your SMTP server. For example, if you’re using the Gmail SMTP servers, that line would be:
relayhost = smtp.gmail.com:587
If you’re using Gmail as your SMTP server you’ll want to configure Postfix to use an alternate location for the authentication information (to keep unwanted eyes from gleaning your credentials). For that, paste the following at the end of the main.conf file:
# outbound relay configurations
smtp_sasl_auth_enable = yes
smtp_sasl_password_maps = hash:/etc/postfix/sasl_passwd
smtp_sasl_security_options = noanonymous
smtp_tls_security_level = may
header_size_limit = 4096000
Save and close the file.
Next we’re going to create the sasl_passwd file with the command:
sudo nano /etc/postfix/sasl/sasl_passwd
In that file paste the following:
[smtp.gmail.com]:587 USERNAME@gmail.com:PASSWORD
Where USERNAME is your Gmail username and PASSWORD is your Gmail app password.
Save and close the file.
Create the hash db for Postfix with the command:
sudo postmap /etc/postfix/sasl/sasl_passwd
Restart Postfix with the command:
sudo systemctl restart postfix
How to configure email alerts
With Postfix up and running, we can now configure the email alerts. To do this, open the configuration file with the command:
sudo nano /etc/apt/apt.conf.d/50unattended-upgrades
In that file, look for the line:
//Unattended-Upgrade::Mail "root";
Change that line to:
Unattended-Upgrade::Mail "email@address";
Where email@address is the email address you want the email to be sent from.
If you only want to be sent notifications on error, look for the line:
//Unattended-Upgrade::MailOnlyOnError "true";
Change the above line to:
Unattended-Upgrade::MailOnlyOnError "true";
Save and close the file.
At this point, the system is ready. The next time an automatic security update is applied you will be sent a notification. If, however, you’ve configured this to only notify on errors, let’s hope you never hear from Postfix.
Otherwise, you should feel a bit better now that your Ubuntu servers are not only automatically applying security updates, but they’ll be notifying you when it happens or when an upgrade fails.

Open Source Weekly Newsletter
You don’t want to miss our tips, tutorials, and commentary on the Linux OS and open source applications. Delivered Tuesdays
Also see
Source of Article