Looking to serve your java apps from a user-friend web application? Look no further than Tomcat. Find out how to easily install this powerful app server on Ubuntu Linux.

Apache Tomcat has been around for a while and is still one of the more popular app server and servlet containers available. This is an open source implementation of several technologies from the Jarkarta EE platform and is free to use by anyone. Apache Tomcat features session replication, clustering, and JMX-based server monitoring and control.
SEE: Hiring kit: Back-end Developer (TechRepublic Premium)
If you’re looking for a Java app server, Apache Tomcat is what you want. I’m going to show you how easy Apache Tomcat is to install on Ubuntu Server.
What you’ll need to install Apache Tomcat
The only things you’ll need for this installation are a running instance of Ubuntu Server 20.04 or 22.04 and a user with sudo privileges. That’s it: Let’s get to work.
How to install Java
The first thing we must do is install Java, specifically OpenJDK 11. To do that, log in to your Ubuntu instance and issue the command:
sudo apt-get install openjdk-11-jdk -y
Once the installation completes, verify it with the command:
java --version
You should see something like this in the output:
openjdk 11.0.17 2022-10-18OpenJDK Runtime Environment (build 11.0.17+8-post-Ubuntu-1ubuntu222.04)OpenJDK 64-Bit Server VM (build 11.0.17+8-post-Ubuntu-1ubuntu222.04, mixed mode, sharing)
How to install Apache Tomcat
Fortunately, there’s a version of Apache Tomcat found in the standard repositories. You can find out exactly which version by issuing the command:
sudo apt-cache search tomcat
The output should show that version tomcat9 is available, and that’s what we’ll install. To install version 9 of Apache Tomcat, issue the command:
sudo apt-get install tomcat9 tomcat9-admin -y
You’ll now want to open port 8080 in your firewall with the command:
sudo ufw allow from any to any port 8080 proto tcp
How to configure Apache Tomcat
We now need to configure Apache Tomcat so you can log in to the web GUI with the proper permissions to use the admin tools. Open the configuration file with:
sudo nano /etc/tomcat9/tomcat-users.xml
In that file, you’ll see a section near the bottom that looks like this:
<!-- <role rolename="tomcat"/> <role rolename="role1"/> <user username="tomcat" password="<changeme>" roles="tomcat"/> <user username="both" password="<changeme>" roles="tomcat,role1"/> <user username="role1" password="<changeme>" roles="role1"/>-->
Change that section to this, where PASSWORD is a strong and unique password:
<role rolename="tomcat"/>
<role rolename="role1"/>
<user username="tomcat" password="PASSWORD" roles="manager-gui"/>
<user username="both" password="PASSWORD" roles="tomcat,role1"/>
<user username="role1" password="PASSWORD" roles="role1"/>
Save and close the file.
Restart Apache Tomcat with:
sudo systemctl restart tomcat9
How to access the web GUI
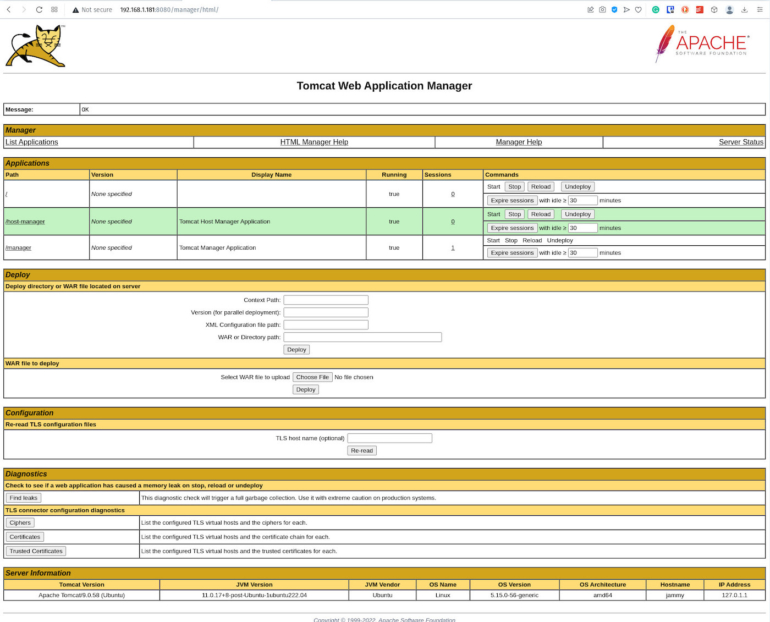
Open a web browser and point it to http://SERVER:8080/manager/html, where SERVER is the IP address or domain of the hosting server. You will be prompted for user credentials. Type tomcat for the username and the password you created in the tomcat-users.xml file. On successful authentication, you’ll be greeted by the Tomcat Web Application Manager (Figure A).
Figure A
The sky’s the limit
With Apache Tomcat installed the sky’s the limit to what you can do with serving your Java apps. By using this handy web-based GUI, you can start deploying your Java apps with ease.
Subscribe to TechRepublic’s How To Make Tech Work on YouTube for all the latest tech advice for business pros from Jack Wallen.
Source of Article