LibreOffice is a great addition to your Chromebook, but out of the box, you won’t be able to open any files. Jack Wallen shows you how to fix this problem.
Image: Jack Wallen
If you’re like me, the Chromebook is an attractive solution that can easily meet many mobile needs. They are cheap alternatives to far more expensive hardware and they perform like champs–rarely, if ever, suffering under the weight of issues that can plague other platforms.
That doesn’t mean the Chromebook is perfect. There is at least one glaring issue that some users might come up against–the lack of a standard office suite. Don’t get me wrong, Google Docs and Drive make a powerful team (one that I use every day), but there are instances where you might prefer to have a standard office suite of tools. The most obvious reason being an easier route to offline work. Although it is very possible (and mostly simple) to use your Chromebook to work with documents offline, it must be set up to do so.
If you don’t want to worry about such things, and you’d like your Chromebook to behave more like a standard laptop, you might have already enabled Linux support for Chrome OS.
SEE: VPN usage policy (TechRepublic Premium)
With that step taken care of, you might have also installed LibreOffice. Then, you probably ran into a serious problem: LibreOffice can’t open any files.
What gives? Why enable the installation of a piece of software, knowing that piece of software doesn’t work out of the box? The explanation is actually pretty simple. LibreOffice uses file locking to prevent others from opening the same file as you. This is not only unnecessary on your Chromebook, it’s also what prevents the tool from opening files in the first place. So, we have to disable it.
Why set this feature out of the box knowing it’ll prevent LibreOffice from working? Since there isn’t a version of LibreOffice specific to Chrome OS, you’re actually installing the Linux version of the tool. Because of this, file locking is enabled by default. Fortunately, all you have to do is disable file locking and you’re good to go.
Although that does make for a serious hurdle to using LibreOffice on Chrome OS, the good news is you can fix that problem.
I’m going to show you how.
What you’ll need
How to disable file locking: Part one
In order to do disable file locking you first must edit a config file. Open the Linux terminal window on your Chromebook and install the nano editor with the command:
sudo apt-get install nano -y
Once that’s installed, open the necessary file for editing with the command:
sudo nano /usr/lib/libreoffice/program/soffice
Look for the following lines:
# file locking now enabled by default SAL_ENABLE_FILE_LOCKING=1 export
SAL_ENABLE_FILE_LOCKING
Comment out both of the lines like so:
# file locking now enabled by default # SAL_ENABLE_FILE_LOCKING=1 export
# SAL_ENABLE_FILE_LOCKING
Save and close the file.
That’s it for the command line.
How to disable file locking: Part two
Now we must configure LibreOffice to not use Locking. To do that, open LibreOffice and then click Tools | Options. In the resulting window, click Advanced. From within the Advanced section, click Open Expert Configuration (Figure A).
Figure A
” data-credit rel=”noopener noreferrer nofollow”>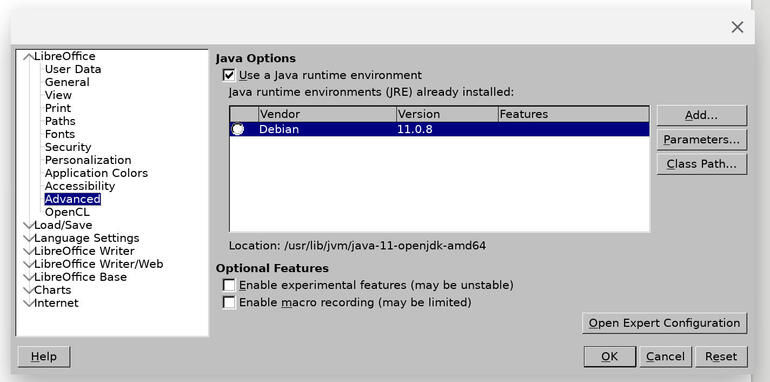
The LibreOffice Advanced configuration window.
In the Expert Configuration window, search for “useLocking.” Double-click the True entry, so it reads False (Figure B).
Figure B
” data-credit rel=”noopener noreferrer nofollow”>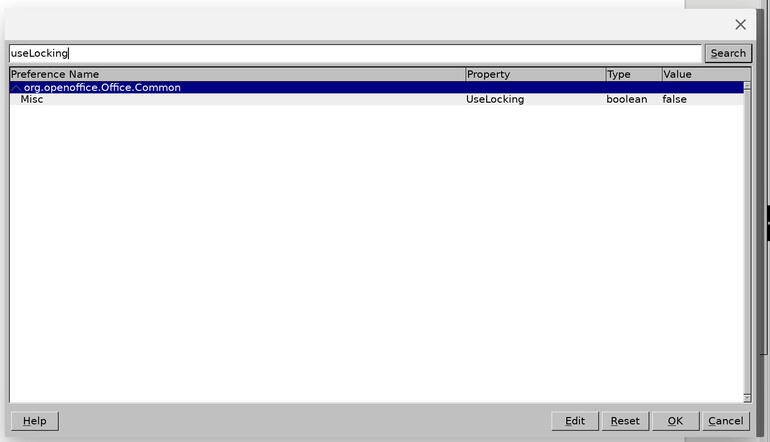
Setting the LibreOffice useLocking option to false.
Next, search for “UseDocumentOOoLockfile” and “usedocumentsystemfilelocking” and make the same change to each (from True to False).
Once you’ve made those changes, click OK in the Expert Configuration window, close out the Options window, and restart LibreOffice.
At this point, you should finally be able to finally work with documents on your Chromebook with LibreOffice. Your Chromebook is now even more productive.

Open Source Weekly Newsletter
You don’t want to miss our tips, tutorials, and commentary on the Linux OS and open source applications. Delivered Tuesdays
Also see
Source of Article