Grafana Enterprise Edition might be just the monitoring tool you need to keep track of all those servers and services on your company network. Find out how to install this powerful tool.

Image: Getty Images/iStockphoto
Your network is filled with servers that deliver all types of services and apps to your company. Keeping tabs on those servers is tantamount to keeping your business up and running. This can be a challenge when you’re faced with monitoring numerous machines and their services.
What do you do?
You turn to a monitoring tool like Grafana. But, if your company is large enough, the community edition of Grafana might not be enough. To that end, you could turn to the Enterprise Edition, which adds features like:
-
Enterprise plugins: Unlimited access to the official Premium Grafana Labs plugins which connect to popular commercial databases and services.
-
Training: Custom training specifically for your team
-
Unlimited support: Escalated access to a core Grafana team
-
Grafana LTS: Long Term Support
-
Critical Response SLA: Have a response team available at any time
-
Company branding: Add your company’s logo
-
User role and permission management: With group membership syncing
-
Datasource permissions: Prevent cross-contamination of data
Although you could certainly get by with using the community edition of Grafana, I want to walk you through the process of installing the Enterprise Edition. For that, you will need to purchase an Enterprise license. To find out the cost, you’ll have to contact Grafana.
SEE: Kubernetes security guide (free PDF) (TechRepublic)
What you’ll need
You can get Grafana installed without an Enterprise license. In fact, you can even create dashboards, add data sources, and do pretty much everything you can with the community edition. However, in order to take advantage of Enterprise features, you must have the license.
How to install Grafana Enterprise
Surprisingly enough, the installation of Grafana Enterprise is actually quite easy. To do so, log in to your Ubuntu Server and make sure it’s updated and upgraded with the following commands:
sudo apt-get update
sudo apt-get upgrade -y
Note: If you run the above commands and the kernel is upgraded, you’ll need to restart the server for the changes to take effect.
Once the upgrade is complete, you can install Grafana Enterprise. Before you install, you’ll need to take care of a single dependency with the command:
sudo apt-get install -y libfontconfig1
Once that is taken care of, download the Grafana Enterprise .deb file with the command:
wget https://dl.grafana.com/enterprise/release/grafana-enterprise_7.0.1_amd64.deb
Install Grafana with the command:
sudo dpkg -i grafana-enterprise_7.0.1_amd64.deb
When the installation completes, start and enable Grafana with the commands:
sudo systemctl start grafana
sudo systemctl enable grafana
How to log in to Grafana
With the installation complete, point a web browser to http://SERVER_IP:3000 (where SERVER_IP is the IP address of the hosting Grafana server). You’ll be prompted for the default login credentials, which are: admin/admin (Figure A).
Figure A
” data-credit rel=”noopener noreferrer nofollow”>
Logging in to Grafana for the first time.
Once you’ve successfully authenticated, you’ll be immediately prompted to create a new password for the admin user (Figure B).
Figure B
” data-credit rel=”noopener noreferrer nofollow”>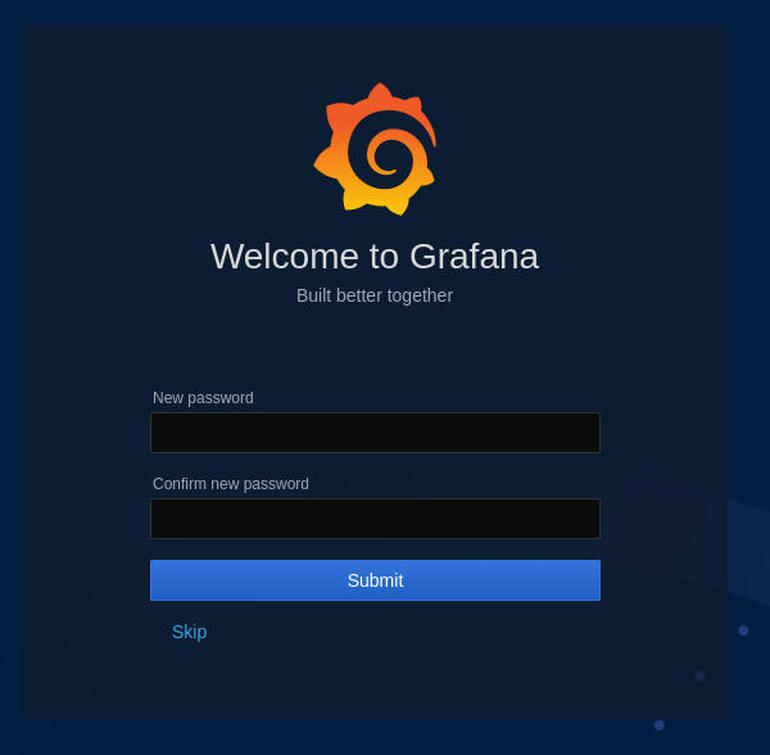
Changing the password for the Grafana admin user.
After changing the password, you’ll be greeted by the default Grafana Enterprise Dashboard where you can start adding data sources and customizing your Dashboard (Figure C).
Figure C
” data-credit rel=”noopener noreferrer nofollow”>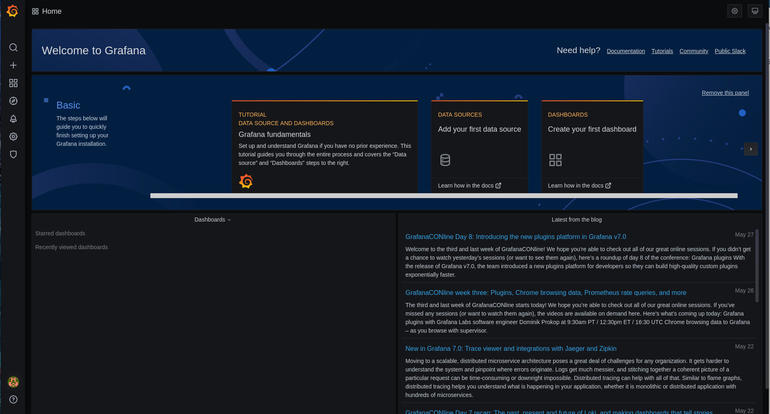
The default Grafana Enterprise Dashboard is ready for you.
How to add your Grafana Enterprise license
To add your Grafana license, you must first log in to your Grafana cloud account and click Licenses (under Enterprise). There, you will see a download token that will download a file named license.jwt. After you’ve downloaded the file to the server hosting Grafana, move it to the necessary directory with the command:
sudo mv license.jwt /var/lib/grafana/data/
If that data directory doesn’t exist, create it with the command:
sudo mkdir /var/lib/grafana/data/
You can also customize the location of the license within the /etc/grafana/grafana.ini file, in this section:
[enterprise]
license_path = /company/secrets/license.jwt
And that’s all there is to installing the Grafana Enterprise Edition on Ubuntu Server 20.04. Enjoy the power of this Enterprise-class monitoring system to help you keep track of all those servers and services on your network.

Data Center Trends Newsletter
DevOps, virtualization, the hybrid cloud, storage, and operational efficiency are just some of the data center topics we’ll highlight. Delivered Mondays and Wednesdays
Also see
Source of Article