If the MySQL command line has you pulling out your hair, Jack Wallen has the remedy in phpMyAdmin. Find out how to start populating your tables with this handy GUI.

Image: Jack Wallen
MySQL database admins tend to do things the hard way. Said “hard way” is via the MySQL terminal console. For many, that console is about as efficient a tool as can be imagined. This same attitude can be found among the Linux community and even Windows admins (who prefer PowerShell over the GUI).
But if the console isn’t your cup o’ tea, you might have turned to phpMyAdmin for a web-based GUI tool. The phpMyAdmin platform is an outstanding tool for managing your MySQL and MariaDB databases. If you don’t have phpMyAdmin installed, check out my tutorial: How to install phpMyAdmin on Ubuntu 18.04.
But how do you populate tables with data? Users new to phpMyAdmin might look at the tool and go, “What the what?” Fortunately, once you get the hang of it, it’s quite simple.
Let me show you how to start populating your MySQL tables, with the help of phpMyAdmin.
What you’ll need
I’m going to assume you already have both MySQL and phpMyAdmin up and running. Other than that, you’ll need a database ready for data.
SEE: Resolve IT issues quickly with these 10 PowerShell cmdlets (TechRepublic download)
How to create a table
The first thing you want to do is create a new table on your database. Log in to phpMyAdmin and then click on the database to be used from the left navigation. In the resulting window, type the name of your new table (Figure A).
Figure A
” data-credit rel=”noopener noreferrer nofollow”>
Adding a new table to a MySQL database in phpMyAdmin.
Let’s create a new table named “employees” that will have columns for name, phone number, email address, and date of birth. Type employees in the text area, make sure the number of columns is 4, and then click Go.
The resulting window requires that you name each column (Figure B).
Figure B
” data-credit rel=”noopener noreferrer nofollow”>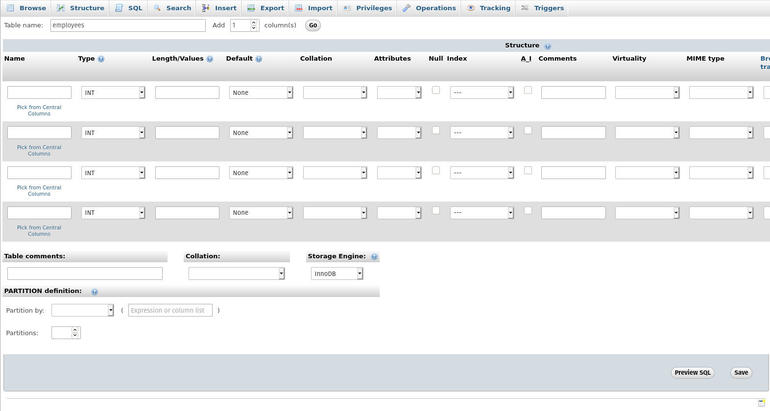
Our table columns are ready to be named.
To name the columns, do the following:
-
For the first column, type name, select VARCHAR from the type drop-down, and give it a length of 50
-
For the second column, type phone, select VARCHAR from the type drop-down, and give it a length of 12
-
For the third column, type email, select VARCHAR from the type drop-down, and give it a length of 50
-
For the final column, type dob, and select date from type drop-down
How to add data to tables
Once you’ve filled out the columns, click Save and the data is saved. Click the new table in the left navigation and then click the Insert tab. In the resulting window, enter data for each column and click Go (Figure C).
Figure C
” data-credit rel=”noopener noreferrer nofollow”>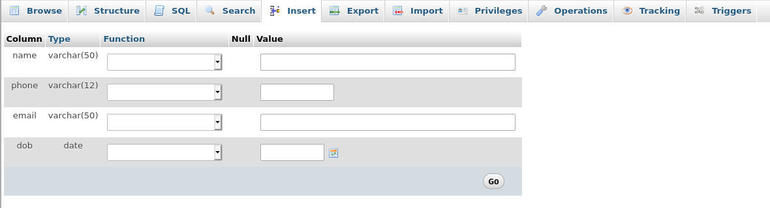
It’s time to enter data into our columns with phpMyAdmin.
You will then see the SQL query window that includes the entire query that was run, in order to add the data. Hint: This is actually a good way to help you learn how to use MySQL from the command line (Figure D).
Figure D
” data-credit rel=”noopener noreferrer nofollow”>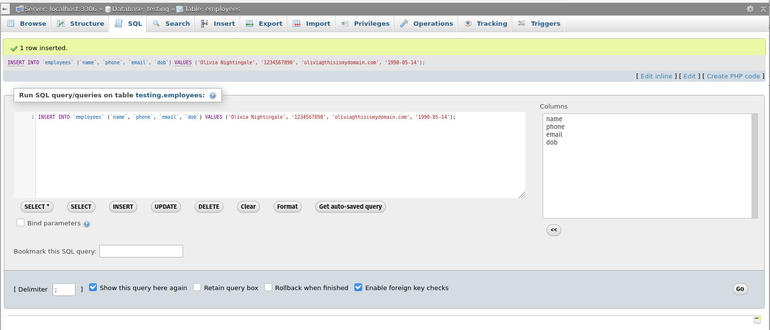
The SQL query that was just run to populate your table.
At this point, your data has been entered into the table. You can then go back to the Insert tab and add more data to the structure. Keep doing that until your table is fully populated.
Congratulations, you’re now ready to begin your long journey with MySQL and phpMyAdmin. Use this tool to help make your MySQL db admin tasks considerably easier. While you’re at it, always take the time to view the SQL queries run, so you can become familiar with the command line.

Open Source Weekly Newsletter
You don’t want to miss our tips, tutorials, and commentary on the Linux OS and open source applications. Delivered Tuesdays
Also see
Source of Article