If you want to lock down your Nextcloud instance so only certain computers can log in, follow these steps.
Image: Jack Wallen
Nextcloud is, far and away, my favorite on-premise cloud solution. In fact, it’s such an outstanding platform, I’ve begun migrating a portion of my work from Google cloud to an in-house Nextcloud instance. It’s one sure way to prevent a third party from having access to my files and/or data.
Out of the box, Nextcloud allows login from any IP address, and for some deployments, this might be a security issue. You could have someone on your internal LAN you don’t want accessing Nextcloud; or, even worse, a nefarious ne’er-do-well could gain access to a user’s computer and then log in to Nextcloud.
You don’t want that.
Fortunately, there are ways to prevent such an occurrence. One such way is to restrict Nextcloud logins to specific IP addresses or IP address ranges. By doing this, you could easily lock down your Nextcloud instance to only allow logins from the machines you use or those machines used by trusted people.
Let me show you how.
SEE: Hybrid cloud: A guide for IT pros (TechRepublic download)
What you’ll need
The one tricky part of this configuration is that the desktops that log in to Nextcloud should use static IP addresses; otherwise, you run the risk of a DHCP lease running out, and your desktop or laptop not being able to log in. So before you begin this, you should at least have the machine you use to administer your Nextcloud instance set for static IP.
You’ll also (obviously) need a running instance of Nextcloud. Finally, you’ll need a Nextcloud user with admin privileges.
How to install the necessary app
In order to make this work, you must install a specific app in Nextcloud. To do that, log in to Nextcloud with your admin user and click the profile icon in the top-right corner. From the drop-down, click Apps. In the resulting window, click the Search icon (magnifying glass) and type ip in the search field. When the results appear, click Download and enable associated machines with Restrict Login To IP Addresses (Figure A).
Figure A
” data-credit rel=”noopener noreferrer nofollow”>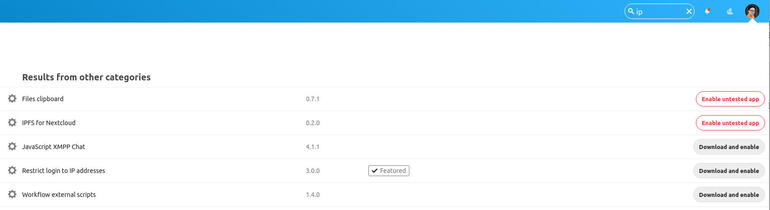
Installing the necessary Nextcloud app for restricting IP addresses.
How to configure IP address restriction
Once again, click your user profile icon and then select Settings from the drop-down. In the resulting page, click the Security entry in the left sidebar. Scroll down until you see the Restrict Login To IP Ranges (Figure B).
Figure B
” data-credit rel=”noopener noreferrer nofollow”>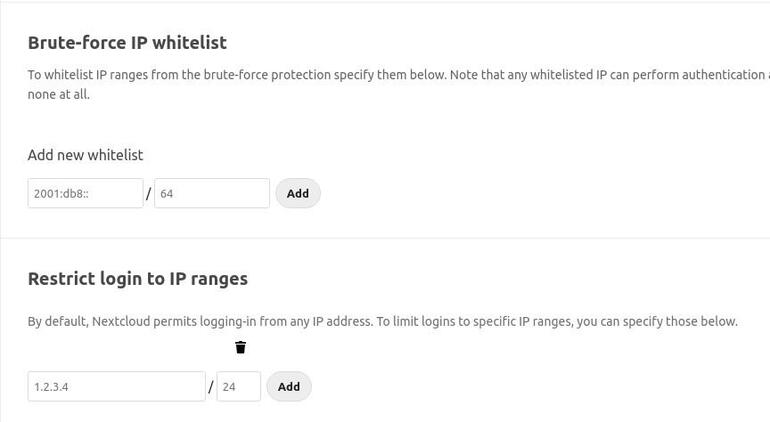
The Restrict Login To IP Addresses settings section in Nextcloud.
Here, you define the IP address or the range of IP addresses that is/are allowed to log in. You do this in the form of either ADDRESS or ADDRESS/SUBNET (where ADDRESS is the IP address and SUBNET is the subnet mask). If you want to allow a machine at 192.168.1.7 access to Nextcloud, you would enter 192.168.1.7 for the IP address and leave the subnet blank. If you want all addresses on your 192.168.1.0 IP scheme, you could enter 192.168.1.0 for the address and 24 as the subnet.
After typing the address and subnet, click Add and when prompted, type your admin password. Once you’ve added the first address, go back and add all of the addresses you need to allow access to your Nextcloud instance.
It is important that you test this configuration before you log out of that instance–make sure you can log in from one of the addresses you’ve configured. Once you are certain you can log in from one of the allowed machines, it’s safe to log out of the one you’re working on.
Congratulations, you’ve restricted login access to Nextcloud to specific IP addresses. Your on-premise cloud solution is a little safer.

Cloud and Everything as a Service Newsletter
This is your go-to resource for XaaS, AWS, Microsoft Azure, Google Cloud Platform, cloud engineering jobs, and cloud security news and tips. Delivered Mondays
Also see
Source of Article