

Microsoft Lists is a great way to share data; other users can view and even edit these lists if the author gives permission. And for our audience, it’s important to know there is a dedicated connector in Microsoft Power BI for Microsoft Lists.
But for interested readers, my first suggestion is this: If you’re deciding on whether to use Microsoft Lists or not and Power BI is a potential destination for that data, don’t use Microsoft Lists. If possible, use SharePoint Lists instead. However, if you’re in a position where you cannot use SharePoint Lists, you can still get Power BI to connect to your Microsoft Lists files. The solution just isn’t super obvious.
SEE: Hiring kit: Microsoft Power BI developer (TechRepublic Premium)
In this tutorial, I’ll show you how to connect Power BI Desktop to Microsoft Lists by using the SharePoint Online List connector. It isn’t a difficult process, but again, it might not be the first place you look when figuring out how to connect to Microsoft Lists.
To demonstrate this connection, I’ll be using Microsoft Power BI Desktop and Microsoft Lists with Microsoft 365 on a Windows 10 64-bit system. If you’re not familiar with how to use Microsoft Lists, you might want to start by reading How to use Microsoft 365 Lists to organize Excel data you must track or share.
Here, you can download the Microsoft Power BI demo file for this tutorial and follow along.
Jump to:
Microsoft Lists vs. Microsoft SharePoint Lists
Technically, Microsoft Lists and SharePoint Lists are the same thing; Microsoft Lists is simply an interface to SharePoint. However, it’s possible for you to use Microsoft Lists and never realize you’re working with SharePoint. That means you might not realize you can use a SharePoint connector to connect Power BI and Microsoft Lists.
How to integrate Microsoft Lists files with SharePoint
If the Microsoft Lists file you’re using is saved to a SharePoint site, you’re in luck because you can generate a Power BI report based on that list with a few quick clicks. To learn how simple this process is, open the Microsoft Lists file as you normally would, and then, take the following steps:
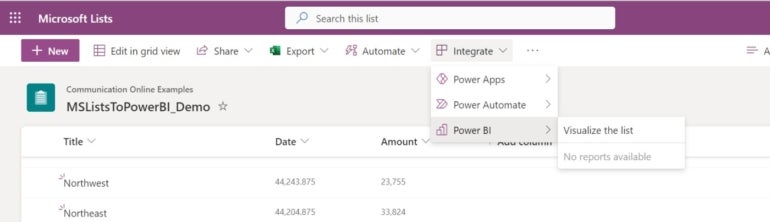
1. With the list open, click Integrate on the menu. If this option isn’t available, unselect all selected records to hide the contextual menu.
2. Choose Power BI from the resulting dropdown.
3. From the submenu, choose Visualize The List (Figure A).
Figure A
4. When the import is complete, click the resulting report link in the top-right corner.
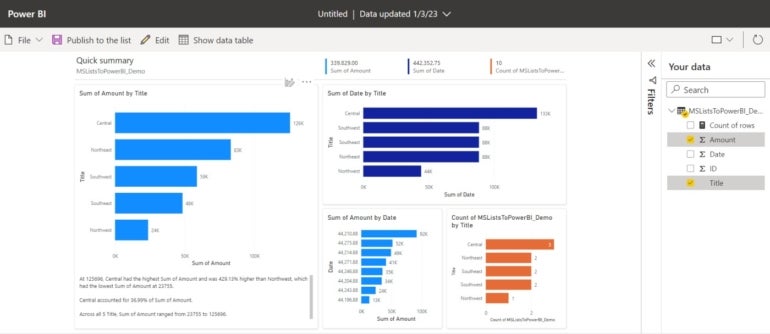
Power BI imports the list data into Power BI (Figure B). The Microsoft Power BI platform builds visuals based on the list data and publishes the report. This is a great starting point for a designer who is working with new data.
Figure B
As mentioned, this quick reporting capability is possible thanks to SharePoint. But as good as this reporting process is, the report isn’t dynamic — you’ve simply created a new .pbix file. If you want to use list data in an existing file, you’ll need to import that data.
How to import Microsoft Lists data into Power BI
The integration feature is powerful and effective at creating a quick prototype or giving you, the designer, a quick start. If you want to use Microsoft Lists data in an existing Power BI file, you’ll have to import the data using a SharePoint connector.
SEE: The Complete Microsoft Power BI Super Bundle (TechRepublic Academy)
If you own both the list and the .pbix file, you should be able to connect without difficulty. If you don’t own the list, ask the owner to grant you permission to access the file before you do anything else.
Copy the SharePoint address
Now, let’s suppose you have a Microsoft Lists file you want to use in Power BI. Sometimes the possibilities can be overwhelming, and we totally miss what’s available. This route I’m going to show you is one of those unexpected solutions, unless you know what to look for.
Before you can do anything else, you’ll need to grab the URL of the Microsoft List file. To do so, simply open the list in Microsoft Lists and copy the URL address.
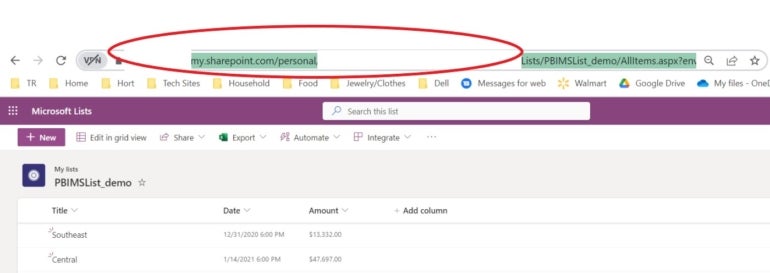
Now, this part gets a bit muddy because you don’t need the entire address — you want to use the address only up to the /Lists component. You can selectively copy it from the URL address control, but doing so is a bit awkward. Alternatively, you can copy the entire URL into a text document and then copy only the part of the URL you need from there.
Figure C shows a list address. Notice the component /Lists and everything following it aren’t included. You need only the first part: the SharePoint address.
Figure C
Import the list data
Now let’s import the list data into an existing Power BI file. First, open Power BI Desktop as you normally would and then take the following steps:
1. From the Get Data dropdown, choose More.
2. From the left pane in the resulting dialog, choose Online Services.
3. To the right, select SharePoint Online List (Figure D).
Figure D
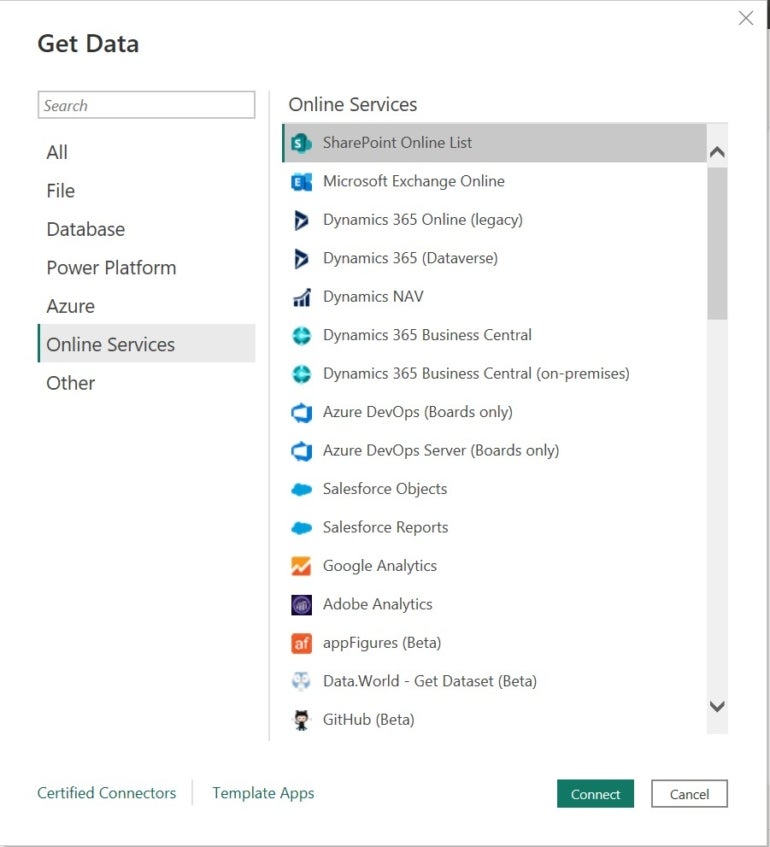
4. Click Connect.
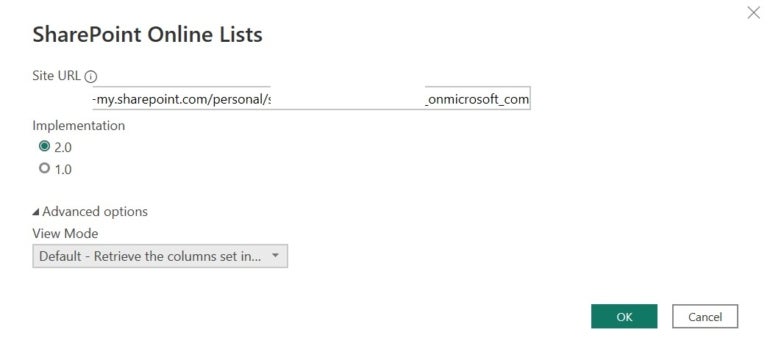
5. When prompted, paste the URL address with your SharePoint address into the Site URL setting.
6. Click 2.0 under Implementation.
7. Expand the Advanced Options section.
8. From the View Mode dropdown, choose the default option (Figure E). If you choose the All option, you’ll import a lot of metadata you don’t need.
Figure E
9. Click Connect.
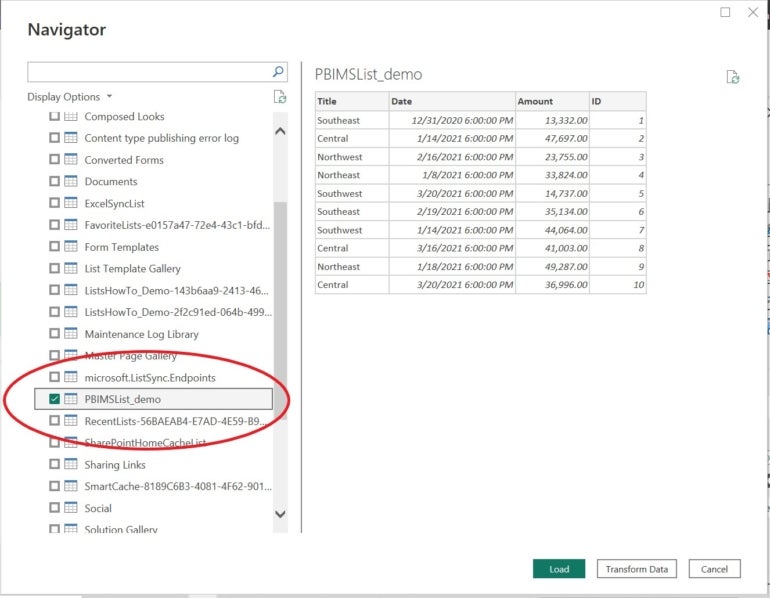
10. In the resulting dialog, find the Microsoft Lists file, and check it in the list to the left (Figure F).
Figure F
11. Click Load. You can click Transform Data, if necessary, when working with your own files. Doing so lets you set data types before loading into Power BI.
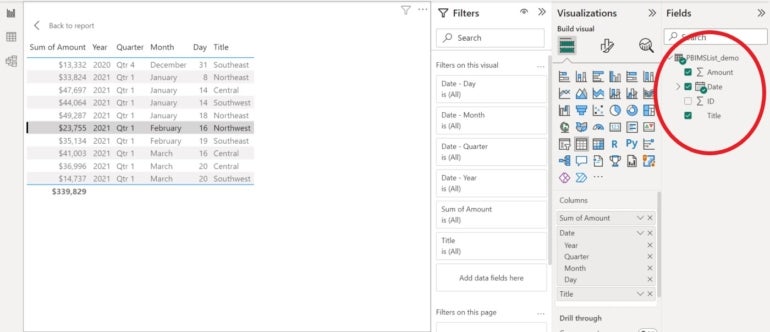
Figure G shows the new table in the Fields pane and a Table visualization, which allows you to check the data against the actual list.
Figure G
Final tips and tricks for using Power BI and Microsoft Lists together
If you have difficulty at any point in this process, review permissions for the Microsoft Lists file you’re pulling into Power BI. If that’s not the problem, check the URL address you entered in step five of Copy the SharePoint address.
SEE: Quick glossary: Business intelligence and analytics (TechRepublic Premium)
Remember, you need only your SharePoint address. If you copy the /Lists component and/or the name of the open list, Power BI will return an error. Getting data into Microsoft Power BI is easy because there are so many dedicated connectors and even custom connectors.
Read next: Best business intelligence tools (TechRepublic)
Source of Article