Looking to add a print server to your data center? Jack Wallen shows you how to get this up and running in about five minutes.

Image: iStockphoto/Ralwel
You probably have a few Linux machines in your data center that have a few CPU cycles to spare. Why not make use of them for a printer server? After all, most businesses still rely on printing for certain departments. When your business is large enough to require a print server, you might as well go with a tried and true system: Linux.
I’m going to walk you through setting up a print server on Ubuntu Server 18.04, using CUPS and Avahi. This process shouldn’t be difficult and, in the end, you’ll have a reliable printer server ready to go.
SEE: How to become a network administrator: A cheat sheet (TechRepublic)
What you’ll need
-
A printer connected to your Linux server
-
The printer driver installed on your Linux server
-
A user with sudo privileges
You do need to make sure the driver for your printer is installed on the server. How you do this will depend on the printer you’re using and, of course, make sure the printer is connected to the server and is able to print.
You should be able to get this solution up and running in about five minutes.
How to install CUPS
The first thing we need to do is install the CUPS package. Log in to your Ubuntu Server in the data center and issue the command:
sudo apt-get install cups -y
Once the installation completes, start and enable the CUPS service with the command:
sudo systemctl start cups
sudo systemctl enable cups
How to configure CUPS
Now that CUPS is installed and running, we need to make a few configuration changes. To open the CUPS configuration file, issue the command:
sudo nano /etc/cups/cupsd.conf
First look for the line:
Browsing Off
Change that line to:
Browsing On
Next, we’ll want to be able to access the web-based dashboard. To to this, look for the line:
Listen localhost:631
Change that line to:
Port 631
We also need to make sure that CUPS is listening on all interfaces. To do that, look for the section:
<Location /> Order allow,deny
</Location>
Change the above section to:
<Location /> Order allow,deny Allow @LOCAL
</Location>
You might also want to add access to the web-based Admin console. To do this, look for the section:
<Location /admin> Order allow,deny
</Location>
Change that section to:
<Location /admin> AuthType Default Require valid-user Order allow,deny Allow @LOCAL
</Location>
Save and close the file.
Restart the CUPS daemon with the command:
sudo systemctl restart cups
How to share via the Bonjour and IPP protocols
Now we’re going to make sure the printer is shared out to your network using the Bonjour and IPP protocols. First we need to install the avahi daemon with the command:
sudo apt install avahi-daemon -y
Next, start and enable the avahi daemon with the commands:
sudo systemctl start avahi-daemon
sudo systemctl enable avahi-daemon
If you have the UFW firewall enabled, make sure to open the necessary port with the command:
sudo ufw allow 5353/udp
How to connect to the printer
At this point, your new printer should be available to add to the desktops that need it. How you add the printer will depend on the desktop operating system you are using. For example, with Pop!_OS Linux, I can open up the Add Printer window from Settings | Devices and the new printer automatically appears (Figure A).
Figure A
” data-credit rel=”noopener noreferrer nofollow”>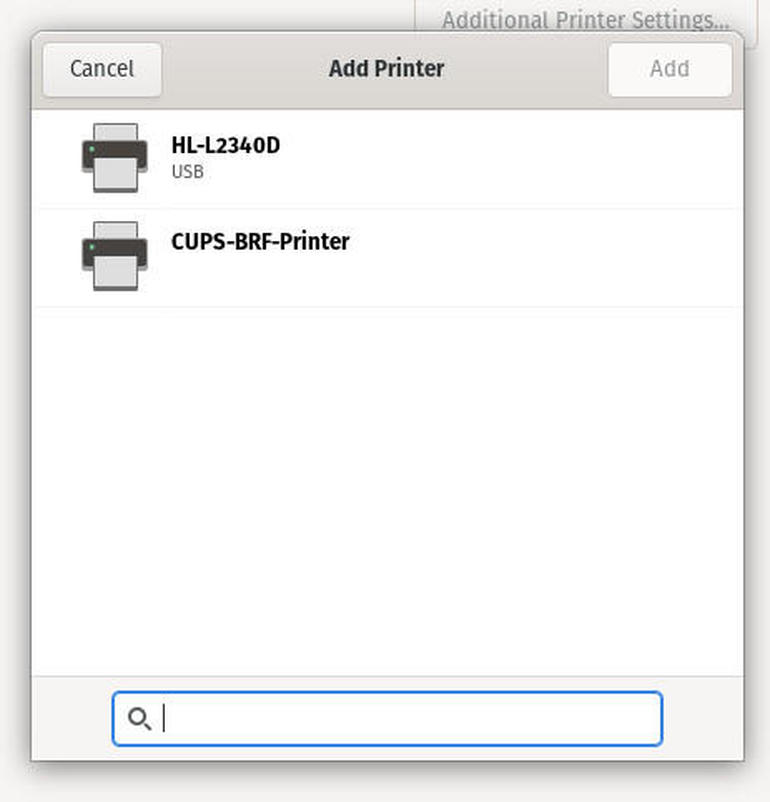
The CUPS-BRF-Printer is my newly available printer.
At this point, your printer should be added to the desktop and able to print. Should you need to, you can manage both the printer and the server from the web-based console by pointing a browser to http://SERVER_IP:631. The admin console is at the address https://SERVER_IP:631/admin (where SERVER_IP is the IP address of the hosting server). For the admin console, you’ll be prompted for a valid username and password.
How to lock down the admin console
It is important to understand that any user on the Linux server can access that console. If you want to lock it down a bit tighter, you could change the line (in /etc/cups/cupsd.conf):
Require valid-user
to
Require user @SYSTEM
You would then have to create a new user and add them to the lpadmin group with the command:
sudo useradd -g lpadmin cupsadmin
Set a password for the cupsadmin user with the command:
sudo passwd cupsadmin
You should then be able to log in to the admin console with the user cupsadmin and the password you just set.
Using this setup is a cost-effective way of adding a print server to your data center–or anywhere within your business.

Data Center Trends Newsletter
DevOps, virtualization, the hybrid cloud, storage, and operational efficiency are just some of the data center topics we’ll highlight. Delivered Mondays and Wednesdays
Also see
Source of Article